Setting up a TCP load balancer
Octavia is a Load Balancer as a Service (LBaaS) solution designed to work with OpenStack. In this guide, we show how to instantiate and configure a simple TCP load balancer in Cleura Cloud. All intermediate steps are presented and explained through a specific scenario, and we work using either the Cleura Cloud Management Panel or the OpenStack CLI.
Prerequisites
Whether you choose the Cleura Cloud Management Panel or the OpenStack CLI, you need to have an account in Cleura Cloud.
Additionally, to use the OpenStack CLI, make sure to enable it for the region you will be working in.
Besides the Python openstackclient module, you will also have to install the Python octaviaclient module.
For that, use either the package manager of your operating system or pip:
apt install python3-octaviaclient
This particular Python module is unavailable via brew, but you can install it via pip.
pip install python-octaviaclient
Scenario and terminology
To configure and test our basic TCP load balancer, we have two servers in the same Cleura Cloud region, both having ncat listening on port 61234/TCP and returning a greeting to clients asking to connect to that port.
Both servers are in the same internal network, and our load balancer will be responsible for redirecting client connections to them in a round-robin fashion.
The load balancer will have a single floating IP address, so prospective clients will have to know only that address and not any of the backend server addresses.
Please note that while working with your load balancer, you will encounter some technical terms which go a long way toward conceptualizing the inner logic of the whole LBaaS system. This guide introduces those terms not beforehand but exactly when needed.
Creating a load balancer
That is only the first step towards our goal, which is to have a fully functional TCP load balancer. We will also need a listener and a pool, but first things first.
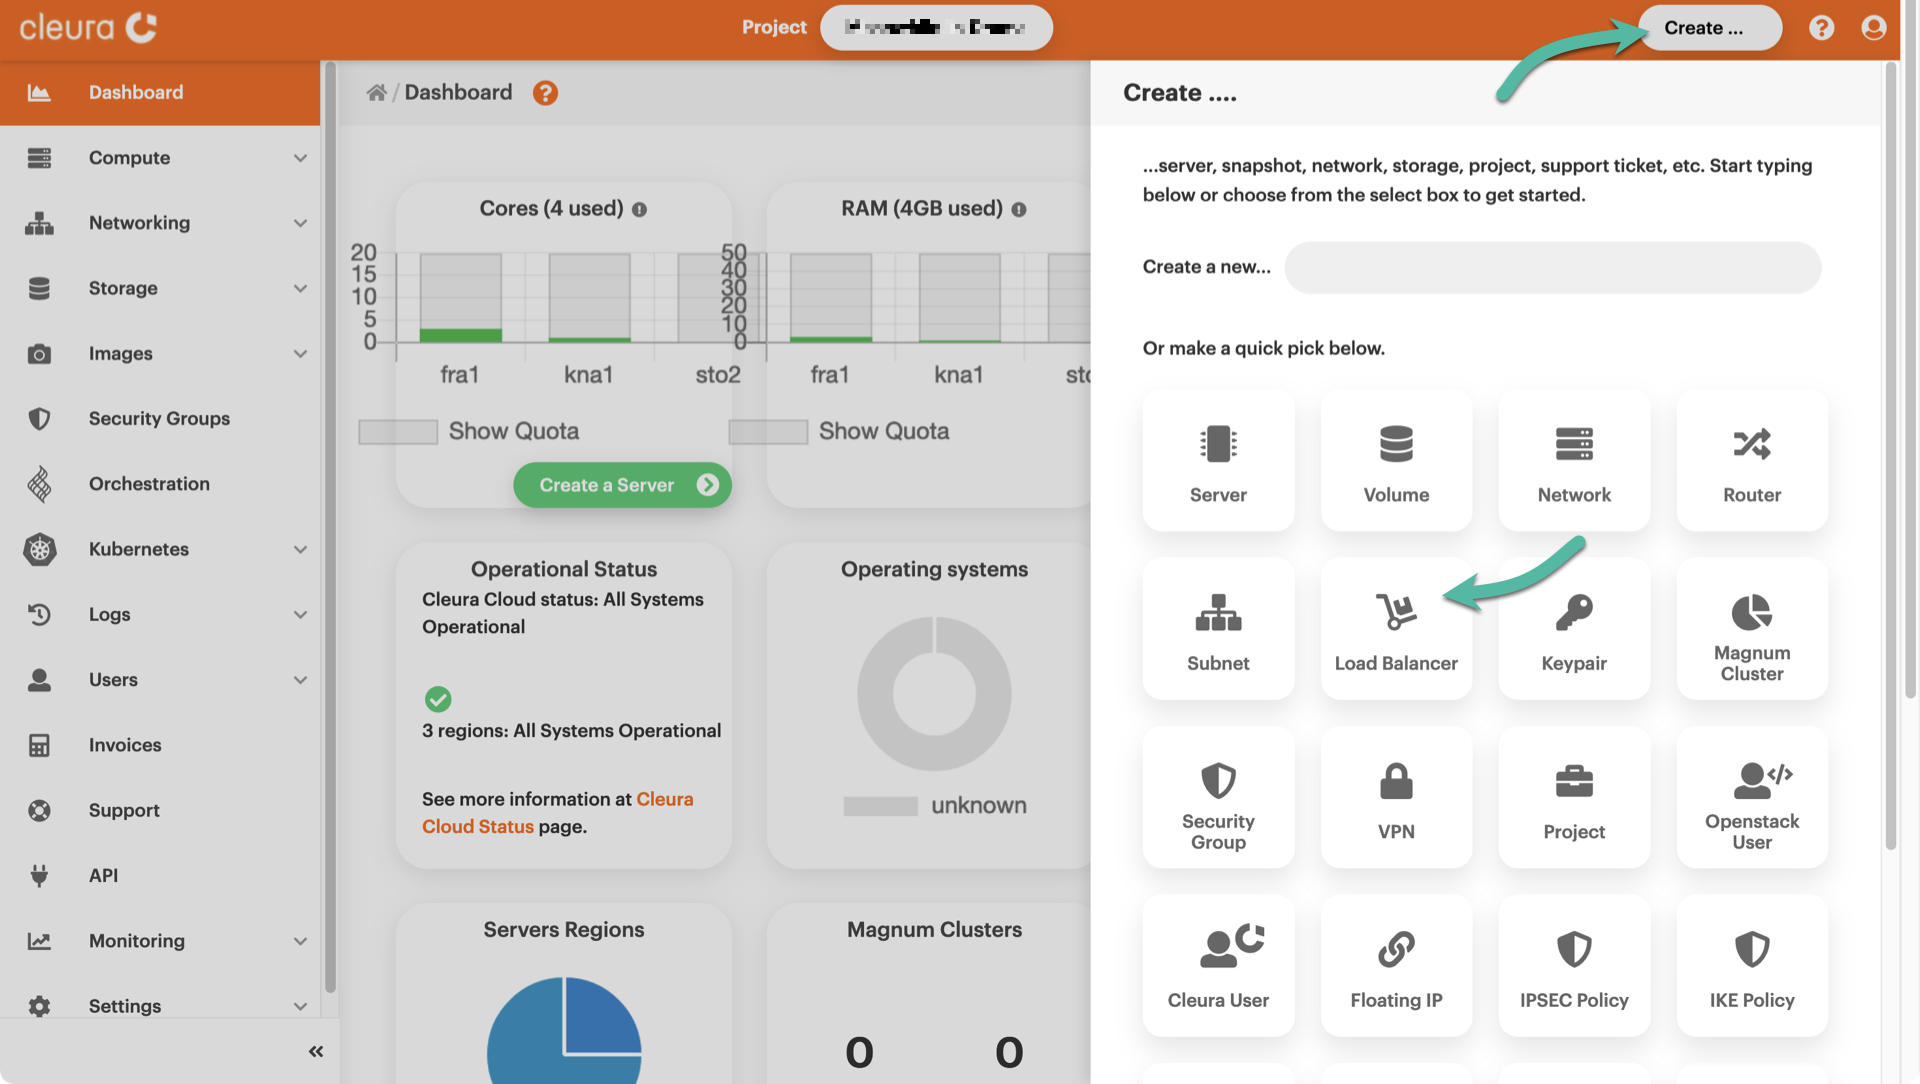
Fire up your favorite web browser, navigate to the Cleura Cloud Management Panel start page, and log into your Cleura Cloud account. On the top right-hand side of the Cleura Cloud Management Panel, click the Create button. A new pane titled Create will slide into view from the right-hand side of the browser window. You will notice several rounded boxes on that pane, each for defining, configuring, and instantiating a different Cleura Cloud object. Go ahead and click the Load Balancer box.
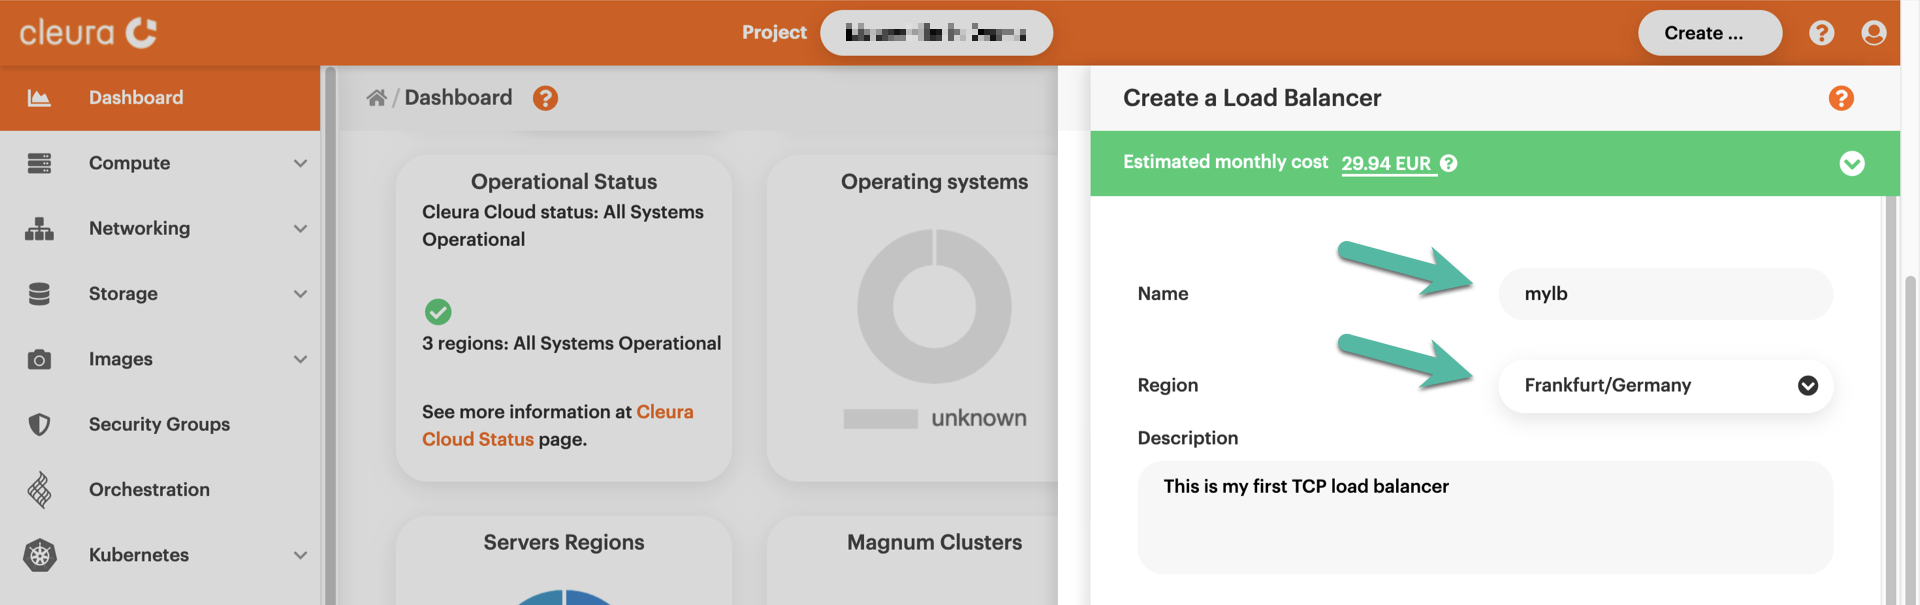
A new pane titled Create a Load Balancer will slide over. At the top, type in a name for the new load balancer and select one of the available regions. Optionally, type in a description.
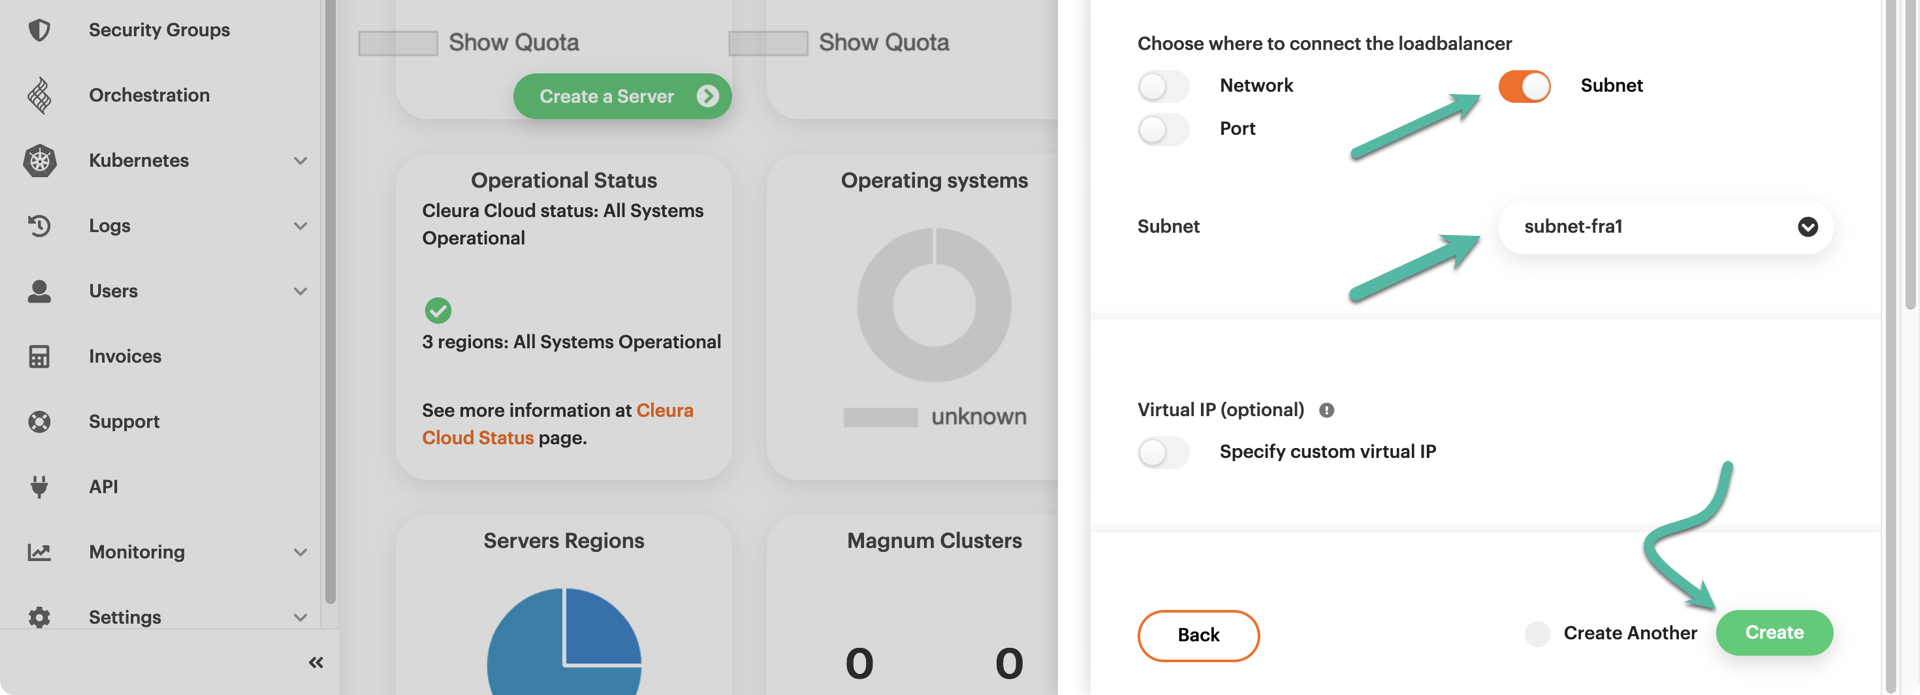
In the same pane, scroll down a bit if you have to and activate the Subnet radio button.
Then, from the Subnet dropdown menu below, select an appropriate subnet for the new load balancer to move in front of.
In our example, the two test servers we have are members of the network-fra1 internal network, and subnet-fra1 is the name of the corresponding subnet.
Click the green Create button below to instantiate the new load balancer.
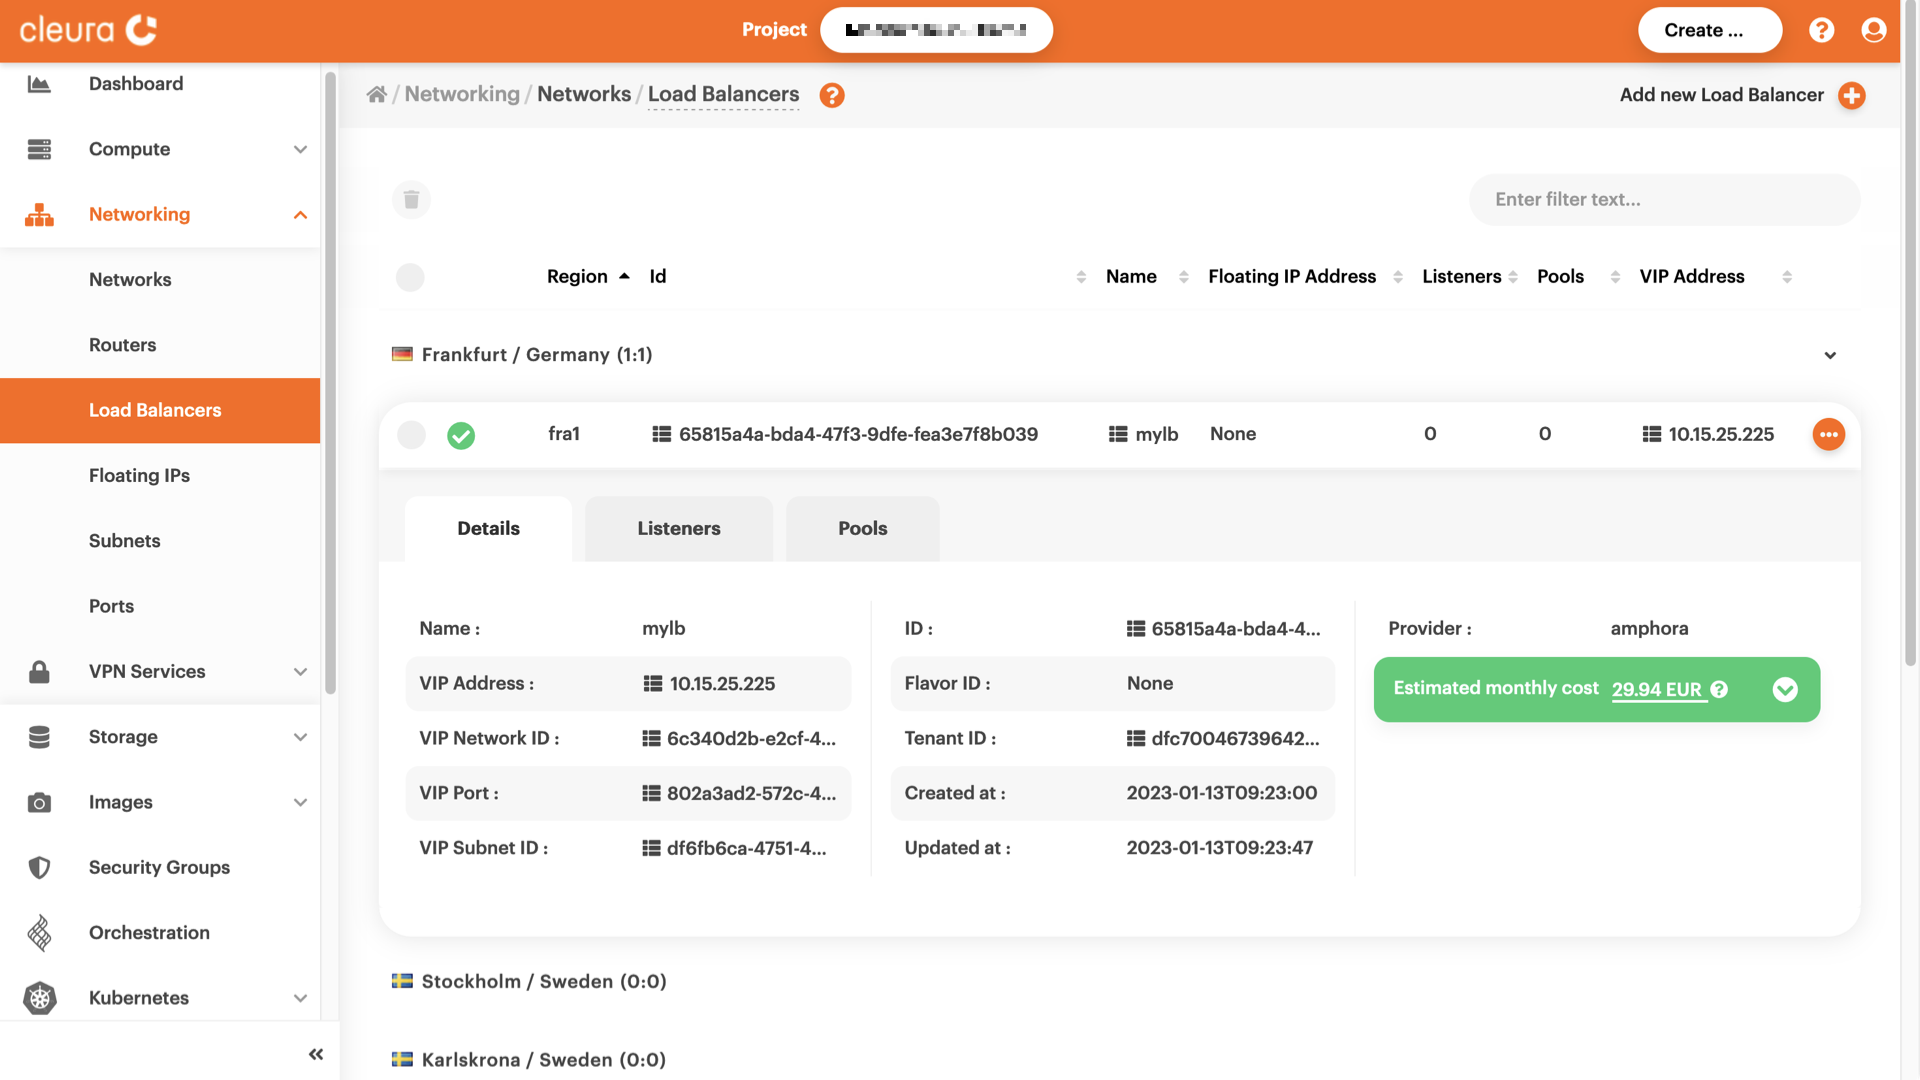
The creation of the new load balancer starts and, unless something goes wrong, finishes successfully in a minute or so. For a view of the load balancer, make sure the left-hand side vertical pane of the Cleura Cloud Management Panel is fully visible, click on the Networking category to expand it, and then click once more on the Load Balancers option. In the main area of the Cleura Cloud Management Panel, select the new load balancer, click the three-dot icon on the right, and select View details from the pop-up menu that appears.
To create your load balancer, type something like this:
openstack loadbalancer create \
    --name mylb --vip-subnet-id subnet-fra1
+---------------------+--------------------------------------+
| Field               | Value                                |
+---------------------+--------------------------------------+
| admin_state_up      | True                                 |
| availability_zone   | None                                 |
| created_at          | 2023-01-16T19:20:01                  |
| description         |                                      |
| flavor_id           | None                                 |
| id                  | 6f04228a-19ca-4e94-8965-10f146a9ad81 |
| listeners           |                                      |
| name                | mylb                                 |
| operating_status    | OFFLINE                              |
| pools               |                                      |
| project_id          | dfc700467396428bacba4376e72cc3e9     |
| provider            | amphora                              |
| provisioning_status | PENDING_CREATE                       |
| updated_at          | None                                 |
| vip_address         | 10.15.25.169                         |
| vip_network_id      | 6c340d2b-e2cf-478a-9074-37e6770decf8 |
| vip_port_id         | c5b49ecb-3631-4e1c-99f0-04b3fba314e2 |
| vip_qos_policy_id   | None                                 |
| vip_subnet_id       | df6fb6ca-4751-4b74-8b3e-5fbda0117cea |
| tags                |                                      |
| additional_vips     |                                      |
+---------------------+--------------------------------------+
In the example above, the name of the load balancer is mylb, and the subnet it will be in front of is named subnet-fra1 (this is the subnet our two test servers are members of).
You will notice in the command output that, at first, the provisioning_status is PENDING_CREATE.
To make sure the load balancer has been successfully created, try this command a couple of times:
openstack loadbalancer show mylb -c provisioning_status
+---------------------+--------+
| Field               | Value  |
+---------------------+--------+
| provisioning_status | ACTIVE |
+---------------------+--------+
Creating a listener
A load balancer needs a way to listen for incoming client connection requests. The listener allows a load balancer to do just that. The load balancer you instantiated has no listener, so let us see how you can equip it with one.
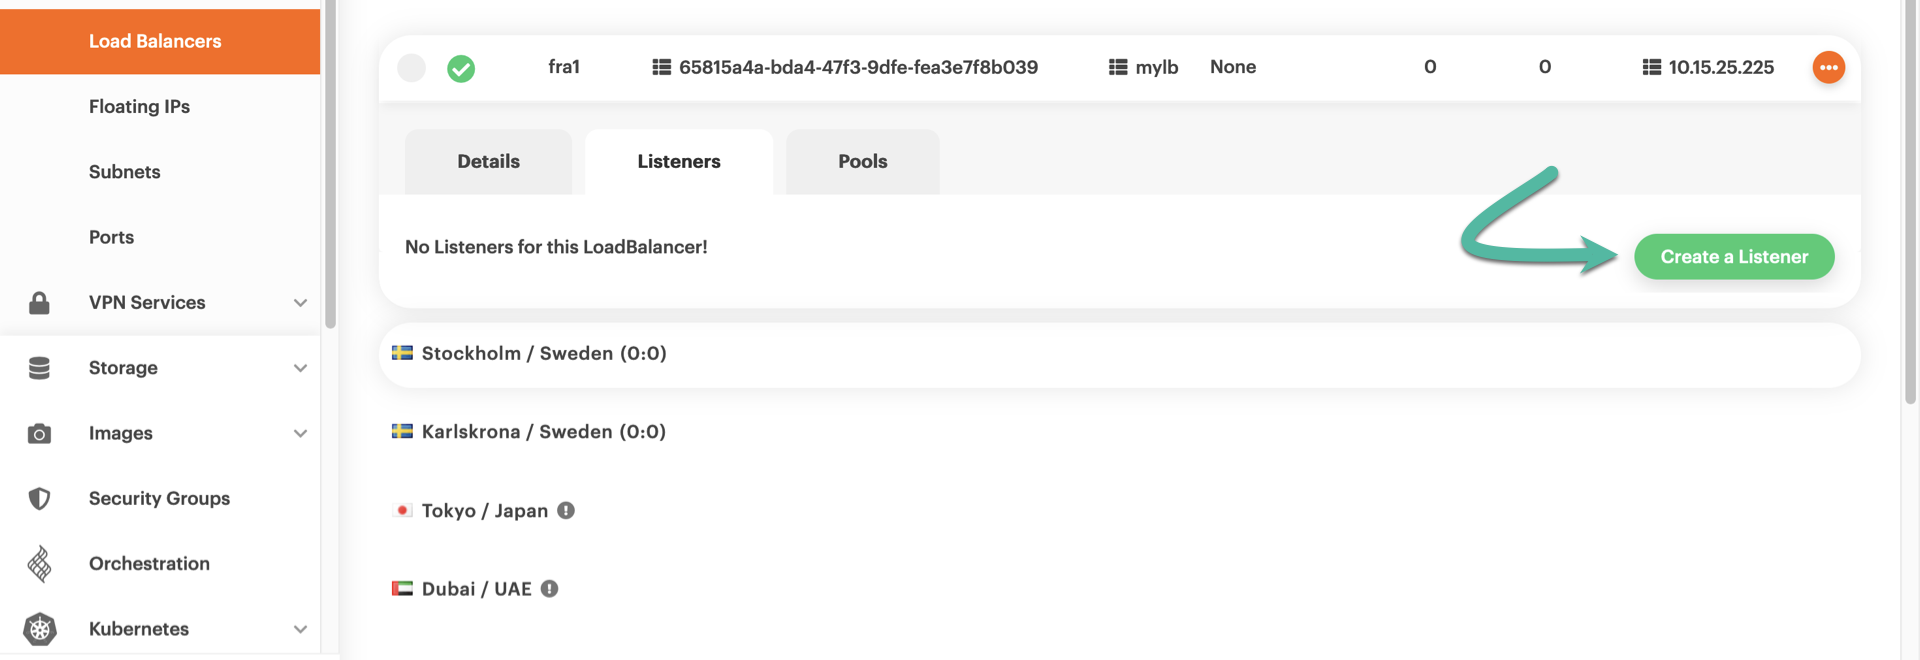
Looking at the detailed view of the new load balancer, you see three tabs: Details, Listeners, and Pools. Click the Listeners tab and notice the message: “No Listeners for this LoadBalancer”. Time to create one, so click the green button labeled Create a Listener.
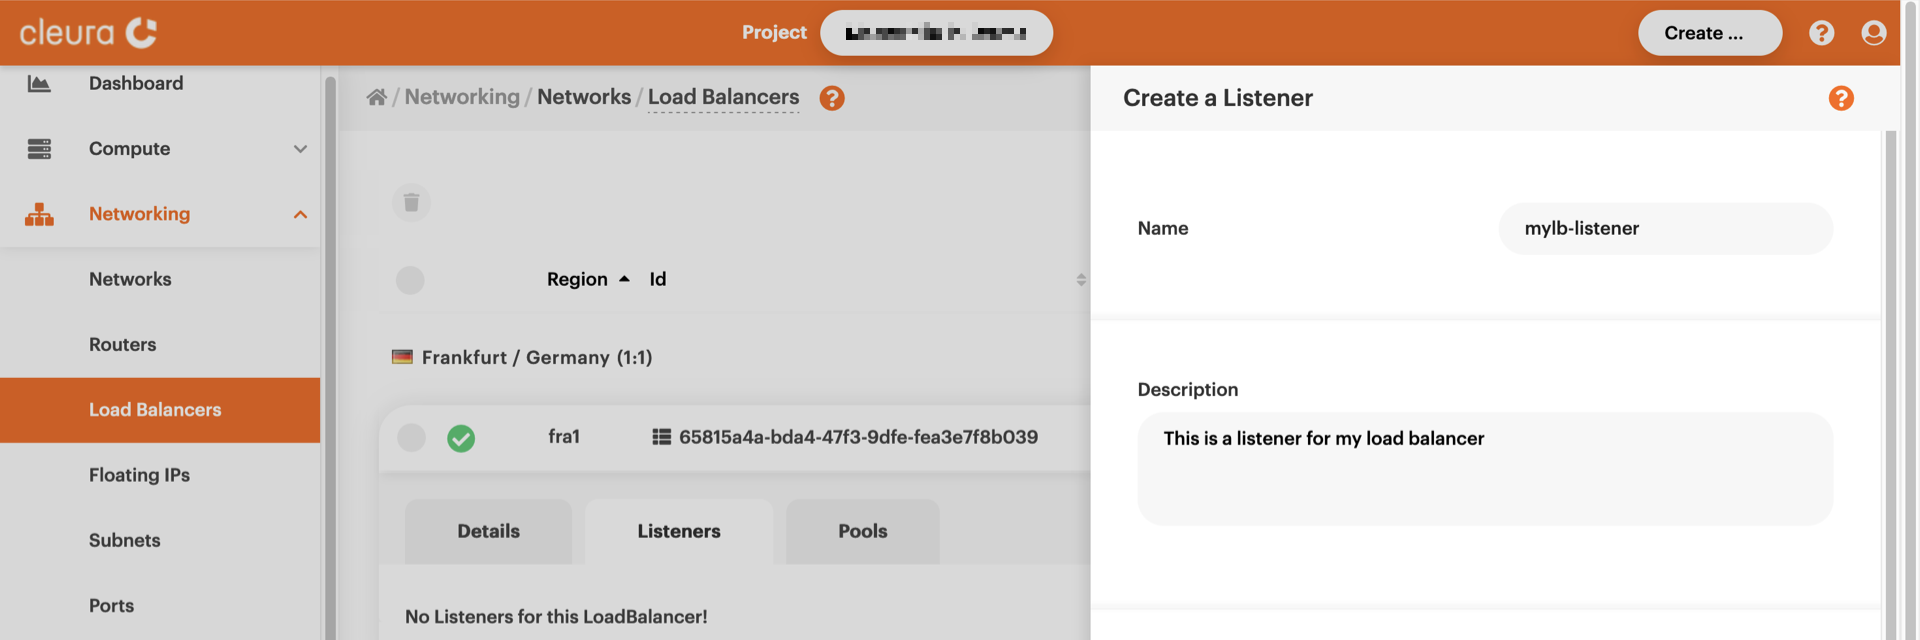
From the right-hand side of the Cleura Cloud Management Panel, a pane named Create a Listener slides over. Type in a name for the new listener — and optionally a description.
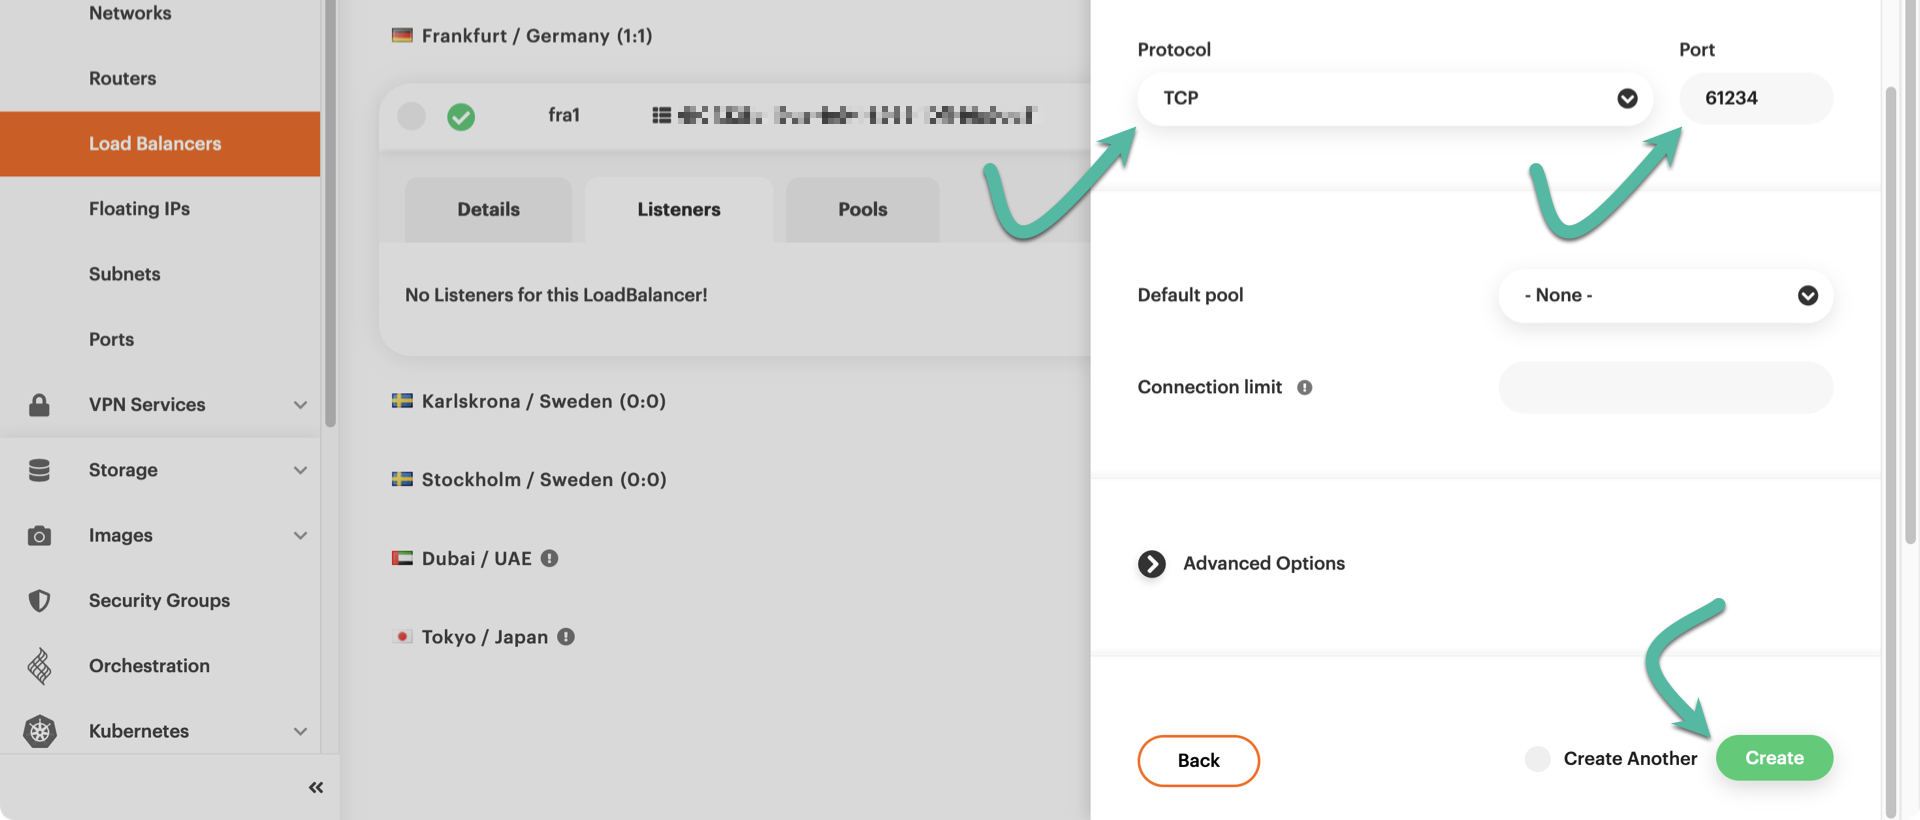
Further down, from the Protocol dropdown menu, select the protocol the listener will be paying attention to. Since you are setting up a TCP load balancer, the protocol for the listener will also have to be TCP. Additionally, type in the listening port. The load balancer will be redirecting connections to a couple of servers, which listen for connections on port 61234/TCP, so it makes sense —though it is not necessary— for the load balancer to use that same listening port. Since you have not yet defined a pool, ignore the Default pool dropdown menu for now. Instead, go ahead and click the green Create button.
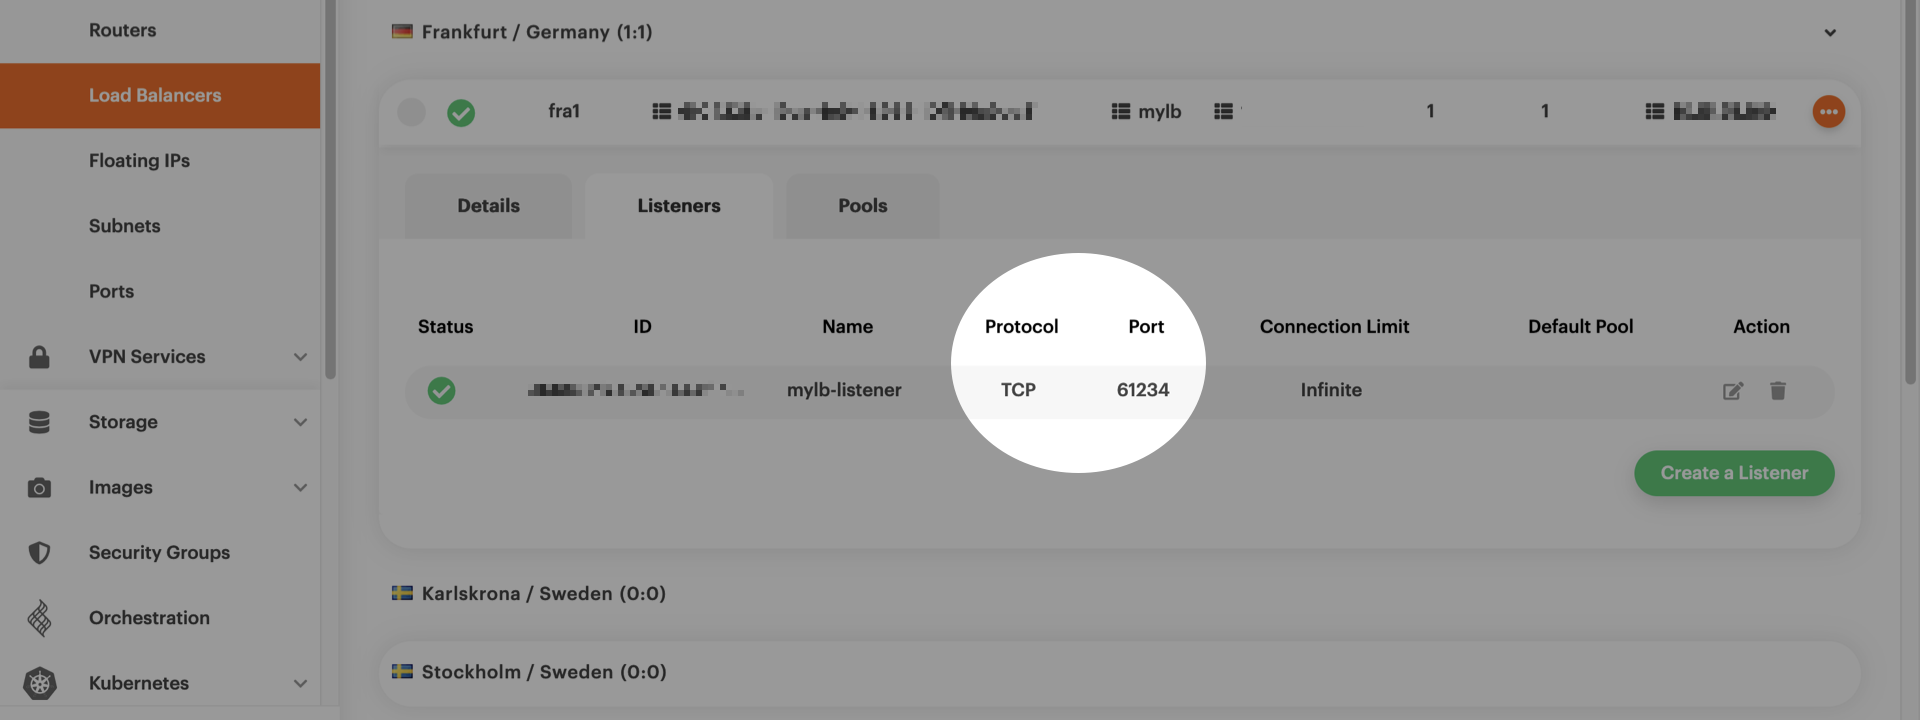
The listener will be created in no time, and you will be able to see its characteristics in the Listeners tab of your load balancer detailed view.
Create a listener for your load balancer like this:
openstack loadbalancer listener create \
    --name mylb-listener --protocol TCP --protocol-port 61234 mylb
+-----------------------------+--------------------------------------+
| Field                       | Value                                |
+-----------------------------+--------------------------------------+
| admin_state_up              | True                                 |
| connection_limit            | -1                                   |
| created_at                  | 2023-01-16T19:32:59                  |
| default_pool_id             | None                                 |
| default_tls_container_ref   | None                                 |
| description                 |                                      |
| id                          | 8b4e3309-c460-44a8-a0af-8dd2868138f9 |
| insert_headers              | None                                 |
| l7policies                  |                                      |
| loadbalancers               | 6f04228a-19ca-4e94-8965-10f146a9ad81 |
| name                        | mylb-listener                        |
| operating_status            | OFFLINE                              |
| project_id                  | dfc700467396428bacba4376e72cc3e9     |
| protocol                    | TCP                                  |
| protocol_port               | 61234                                |
| provisioning_status         | PENDING_CREATE                       |
| sni_container_refs          | []                                   |
| timeout_client_data         | 50000                                |
| timeout_member_connect      | 5000                                 |
| timeout_member_data         | 50000                                |
| timeout_tcp_inspect         | 0                                    |
| updated_at                  | None                                 |
| client_ca_tls_container_ref | None                                 |
| client_authentication       | NONE                                 |
| client_crl_container_ref    | None                                 |
| allowed_cidrs               | None                                 |
| tls_ciphers                 | None                                 |
| tls_versions                | None                                 |
| alpn_protocols              | None                                 |
| tags                        |                                      |
+-----------------------------+--------------------------------------+
To check the provisioning_status, type the following:
openstack loadbalancer listener show mylb-listener -c provisioning_status
+---------------------+--------+
| Field               | Value  |
+---------------------+--------+
| provisioning_status | ACTIVE |
+---------------------+--------+
Since you wanted to create a TCP load balancer, in the command above, you specified the connection protocol via the --protocol parameter.
Also, the new load balancer will be redirecting connections to a couple of servers listening on port 61234, so it makes sense to set the listening port to 61234 (see the --protocol-port parameter).
Creating a pool
Any server accepting connections from the listener is said to be a member of a pool. For our load balancer to work, we must create a pool and explicitly list its members.
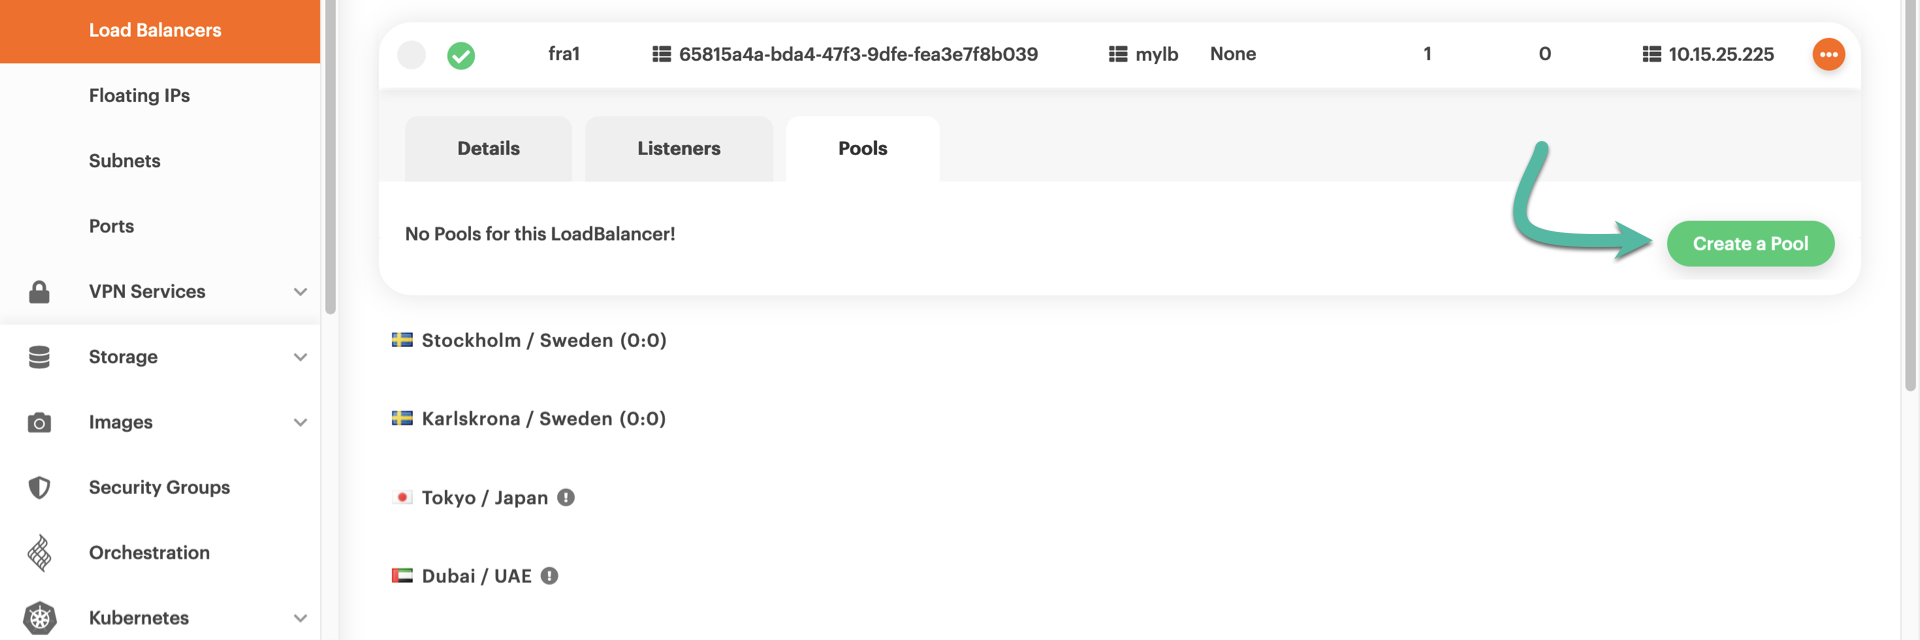
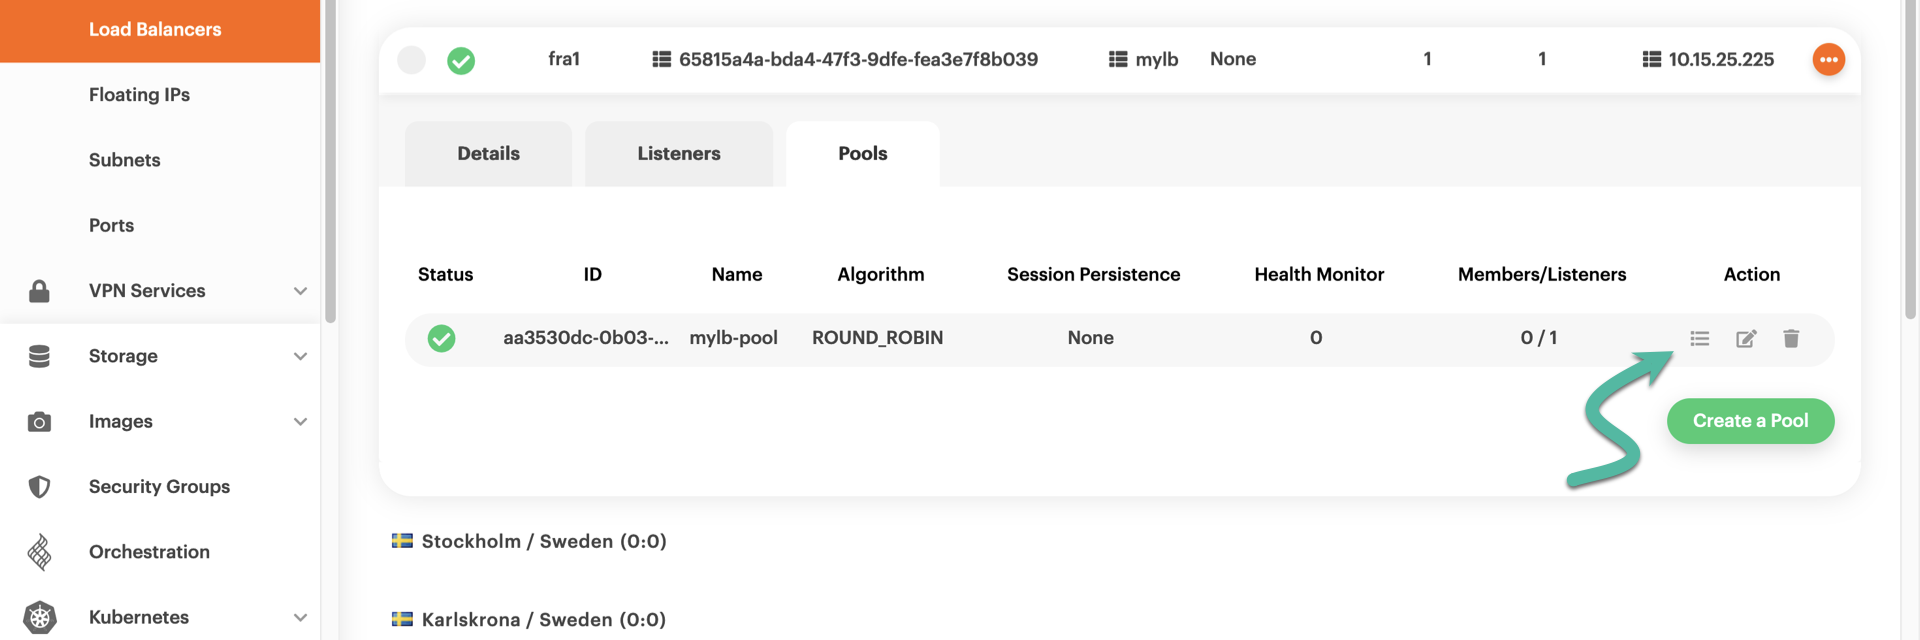
With the detailed view of the load balancer expanded, click the Pools tab. You will notice the message “No pools for this LoadBalancer”, so click the green Create a Pool button.
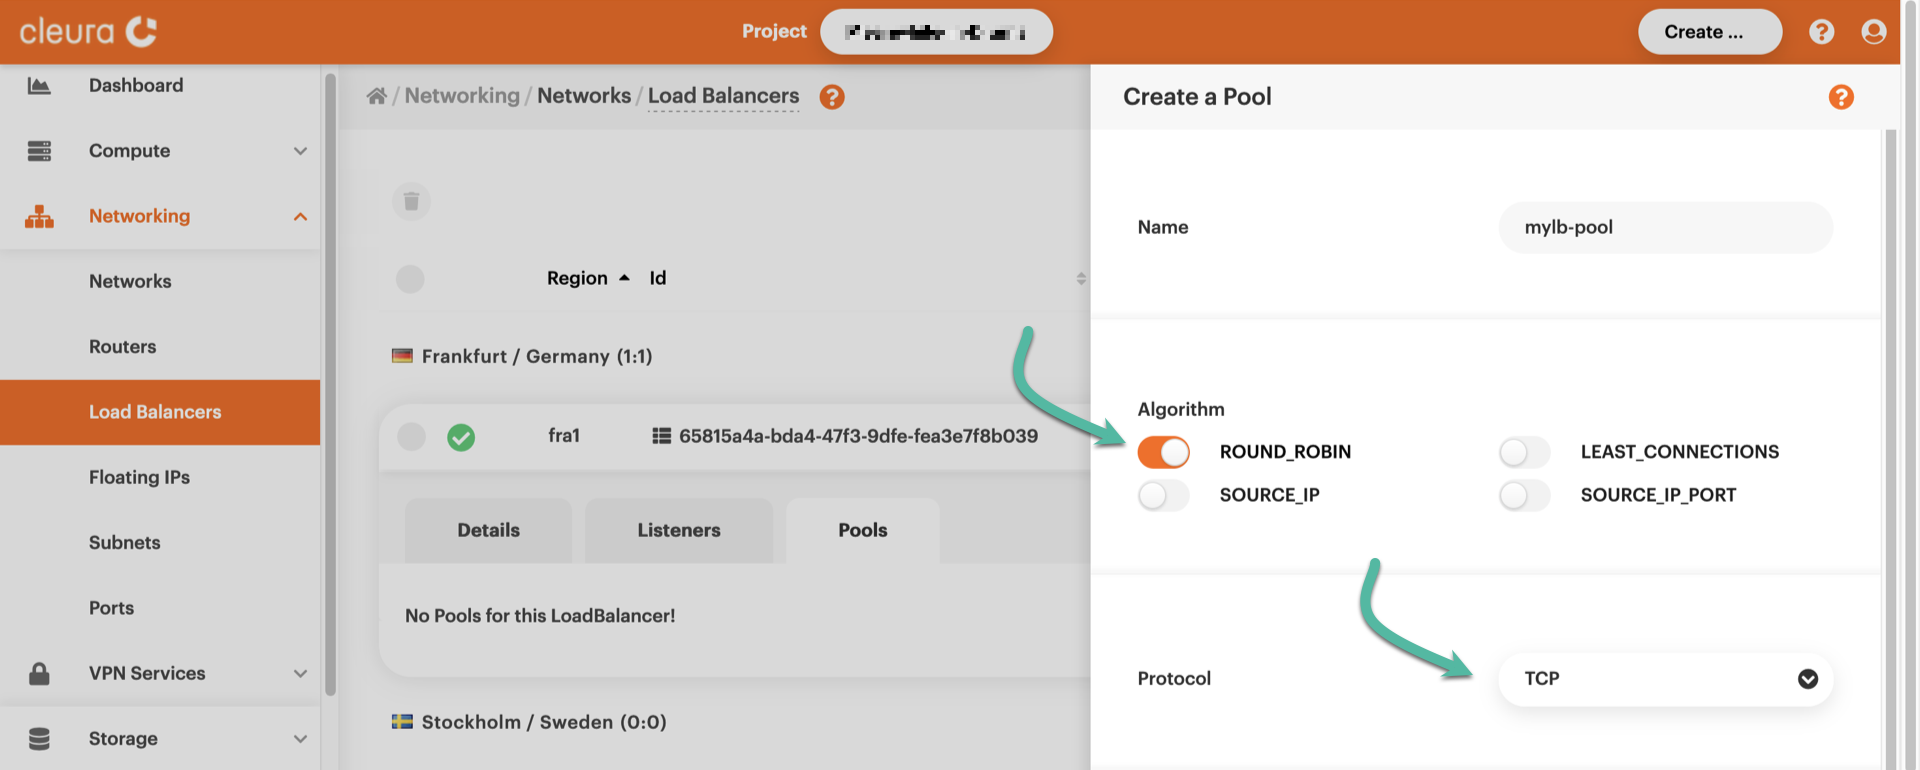
A new pane named Create a Pool slides over. First, type in a name for the new pool. For the Algorithm, make sure to select ROUND_ROBIN. Since you are configuring a TCP load balancer, set the Protocol to TCP.
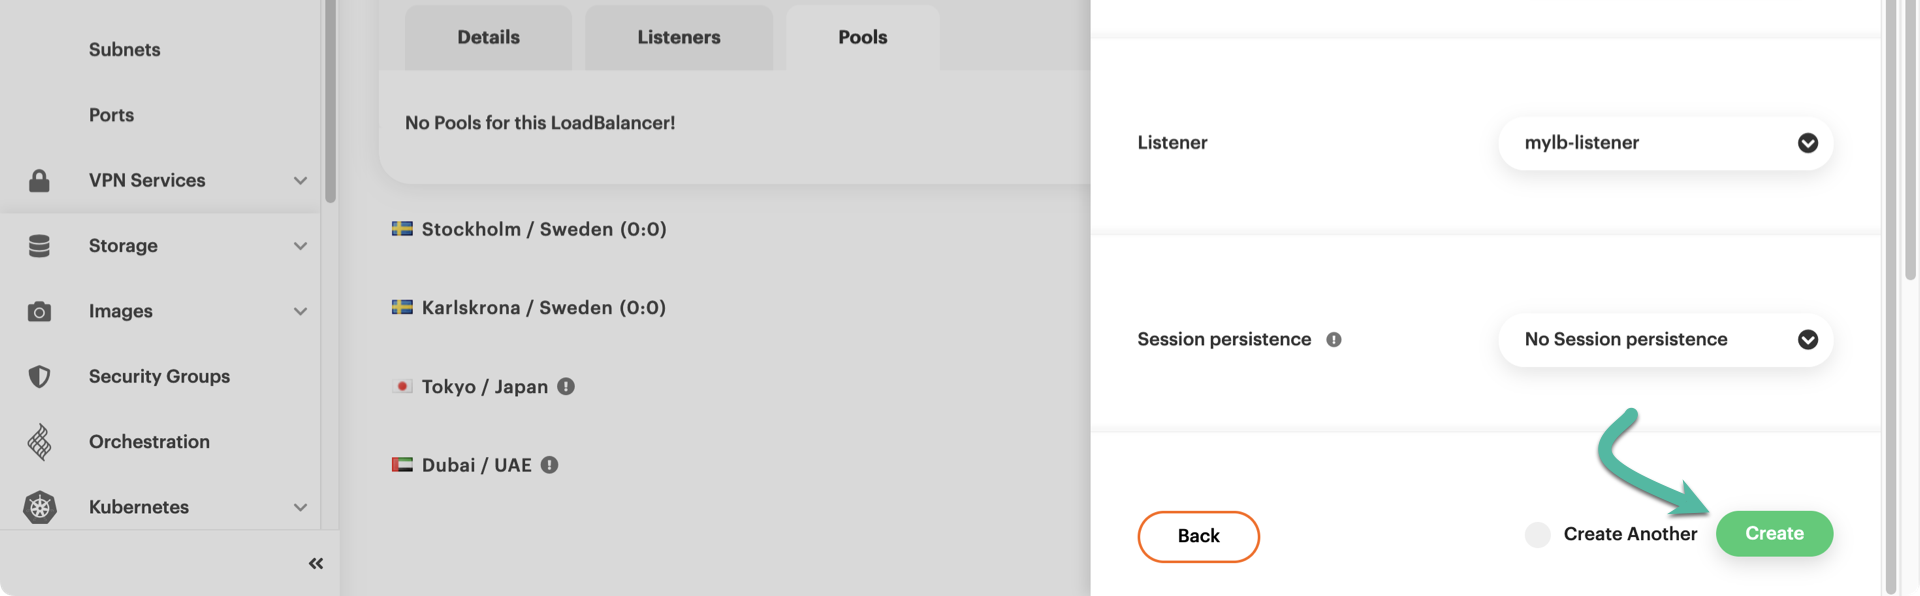
A little bit further down the pane, there is the Listener dropdown menu; select the one you created in the previous step. Leave the Session persistence parameter as it is, and create your pool with a click on the green Create button.
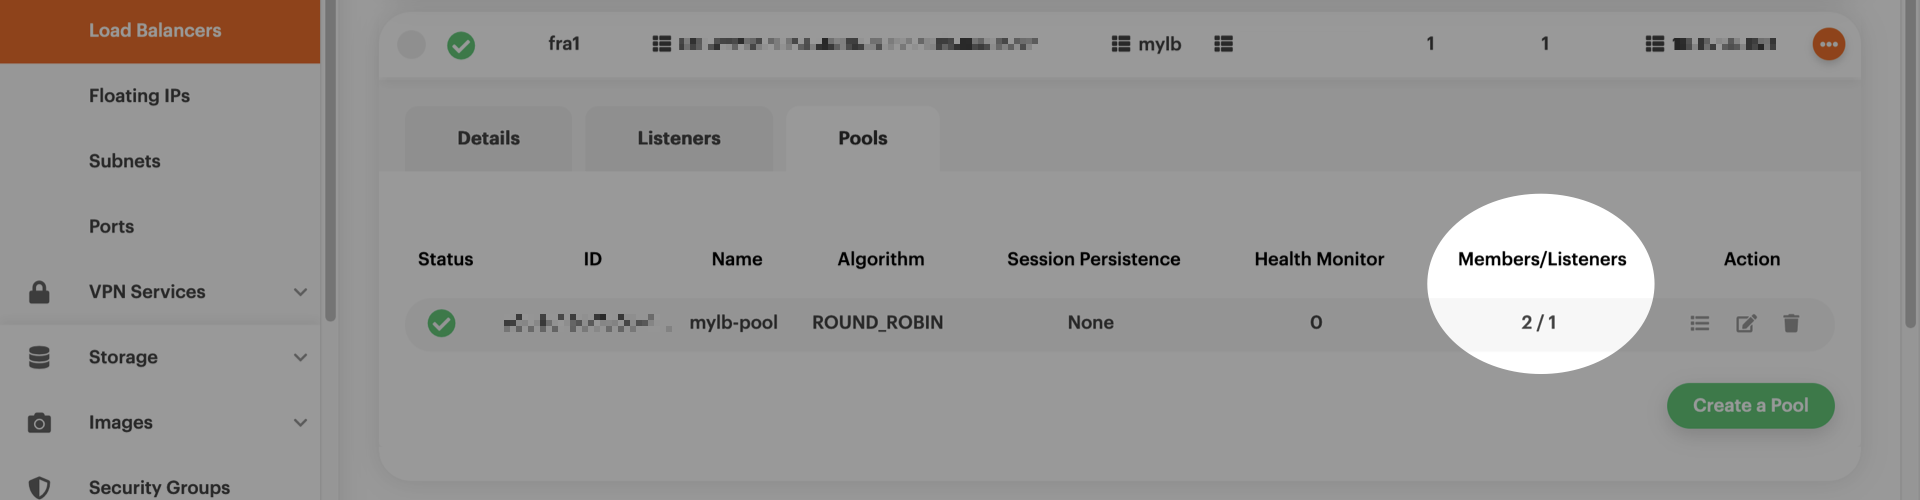
The pool is instantaneously available; as you can see, it has zero members and one listener (the one you created in the previous step).
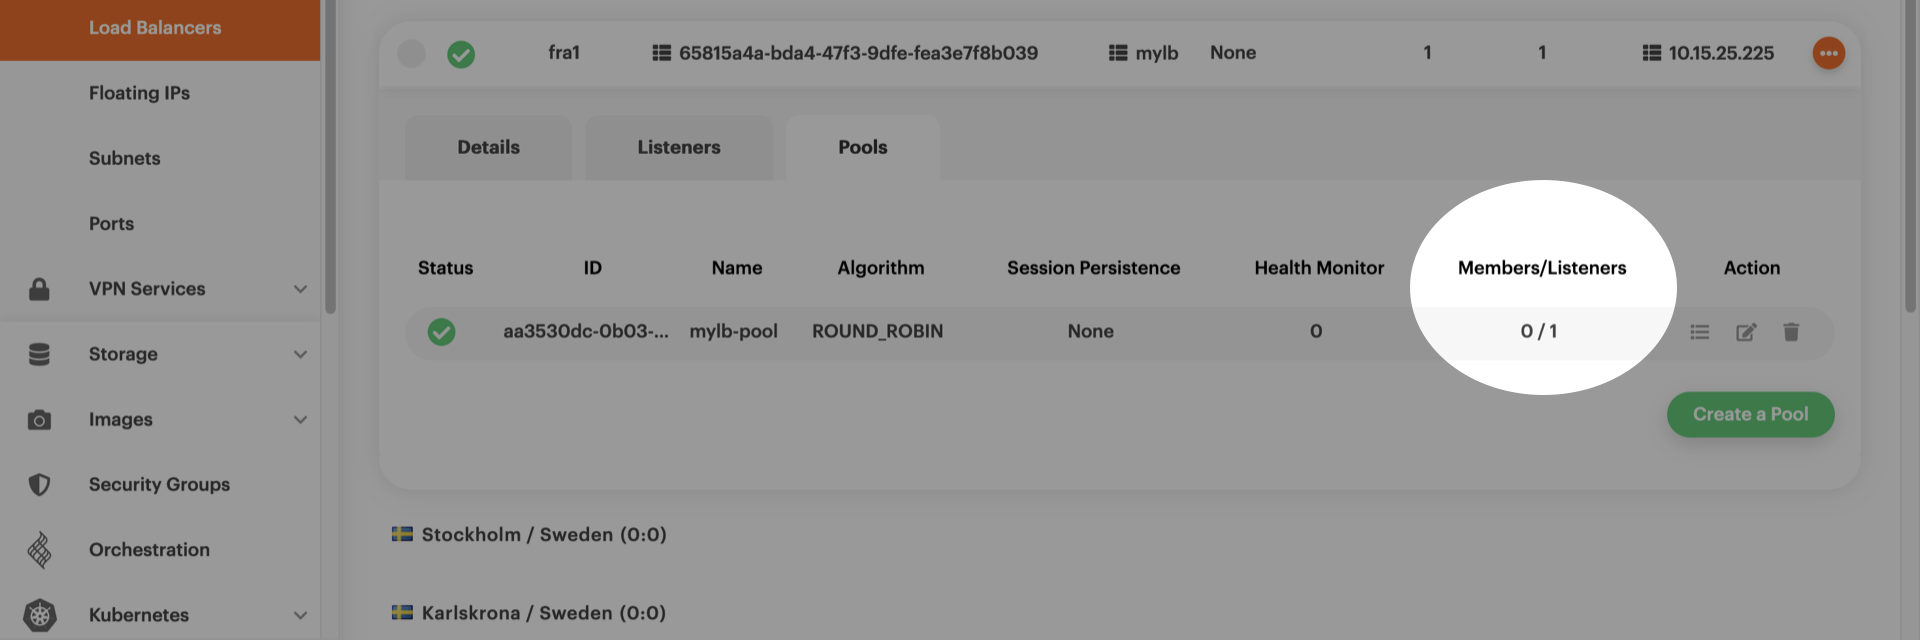
Notice that the listener already knows about the new pool, even though you did not explicitly mention it.

To create a pool named mylb-pool that distributes incoming TCP connections to its members in a round-robin fashion from the listener named mylb-listener, type this command:
openstack loadbalancer pool create \
    --name mylb-pool --lb-algorithm ROUND_ROBIN \
    --listener mylb-listener --protocol TCP
+----------------------+--------------------------------------+
| Field                | Value                                |
+----------------------+--------------------------------------+
| admin_state_up       | True                                 |
| created_at           | 2023-01-16T19:52:02                  |
| description          |                                      |
| healthmonitor_id     |                                      |
| id                   | e5b9c18d-7c0b-4b95-9dc8-7a778aeb039c |
| lb_algorithm         | ROUND_ROBIN                          |
| listeners            | 8b4e3309-c460-44a8-a0af-8dd2868138f9 |
| loadbalancers        | 6f04228a-19ca-4e94-8965-10f146a9ad81 |
| members              |                                      |
| name                 | mylb-pool                            |
| operating_status     | OFFLINE                              |
| project_id           | dfc700467396428bacba4376e72cc3e9     |
| protocol             | TCP                                  |
| provisioning_status  | PENDING_CREATE                       |
| session_persistence  | None                                 |
| updated_at           | None                                 |
| tls_container_ref    | None                                 |
| ca_tls_container_ref | None                                 |
| crl_container_ref    | None                                 |
| tls_enabled          | False                                |
| tls_ciphers          | None                                 |
| tls_versions         | None                                 |
| tags                 |                                      |
| alpn_protocols       | None                                 |
+----------------------+--------------------------------------+
Once more, you may check the provisioning_status by typing the following:
openstack loadbalancer pool show mylb-pool -c provisioning_status
+---------------------+--------+
| Field               | Value  |
+---------------------+--------+
| provisioning_status | ACTIVE |
+---------------------+--------+
Adding members to the pool
The pool you created has no members, so it is time to populate it.
In the detailed view of your load balancer, go to the Pools tab and click the bulleted-list icon.
A new pane titled Modify Pool Members appears, listing all the servers that share the same region with the load balancer.
In our example, there are three servers.
We created srv-lbaas-1 and srv-lbaas-2 to test the load balancer, so now we click on the corresponding plus-sign icons to add those to the pool.
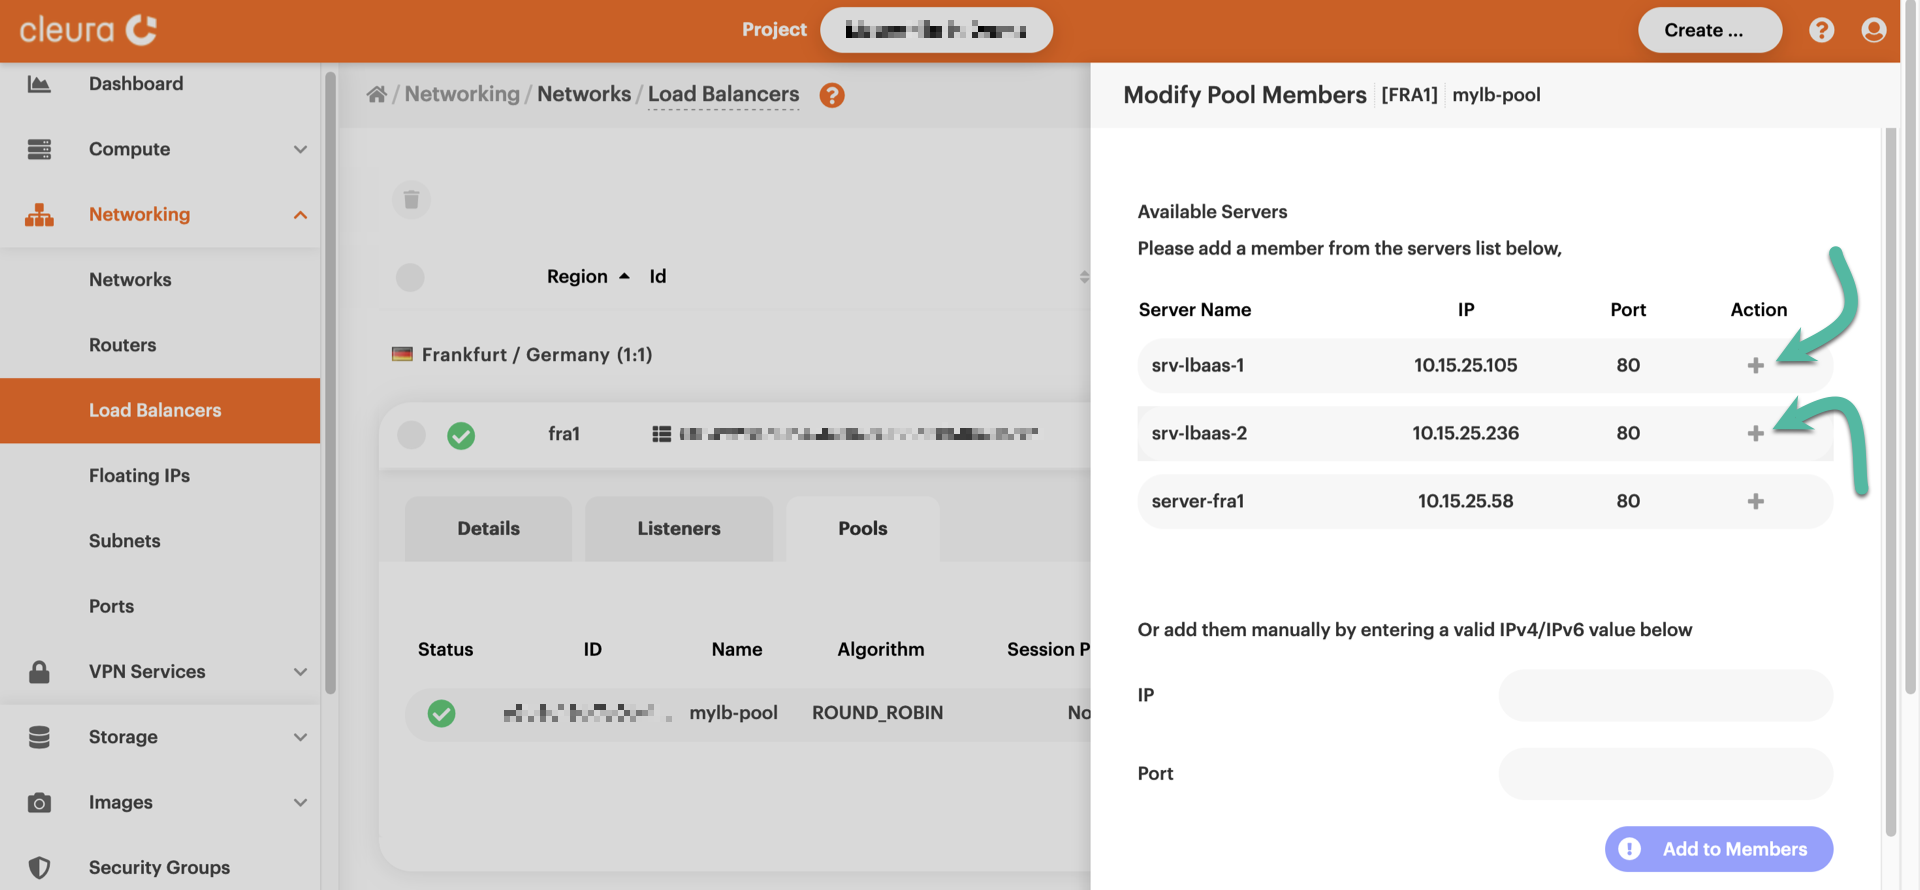
You may have noticed that the listening port of each server we added is by default 80, but we want port 61234. To change the listening port of a server, just click the corresponding notepad-and-pen icon.
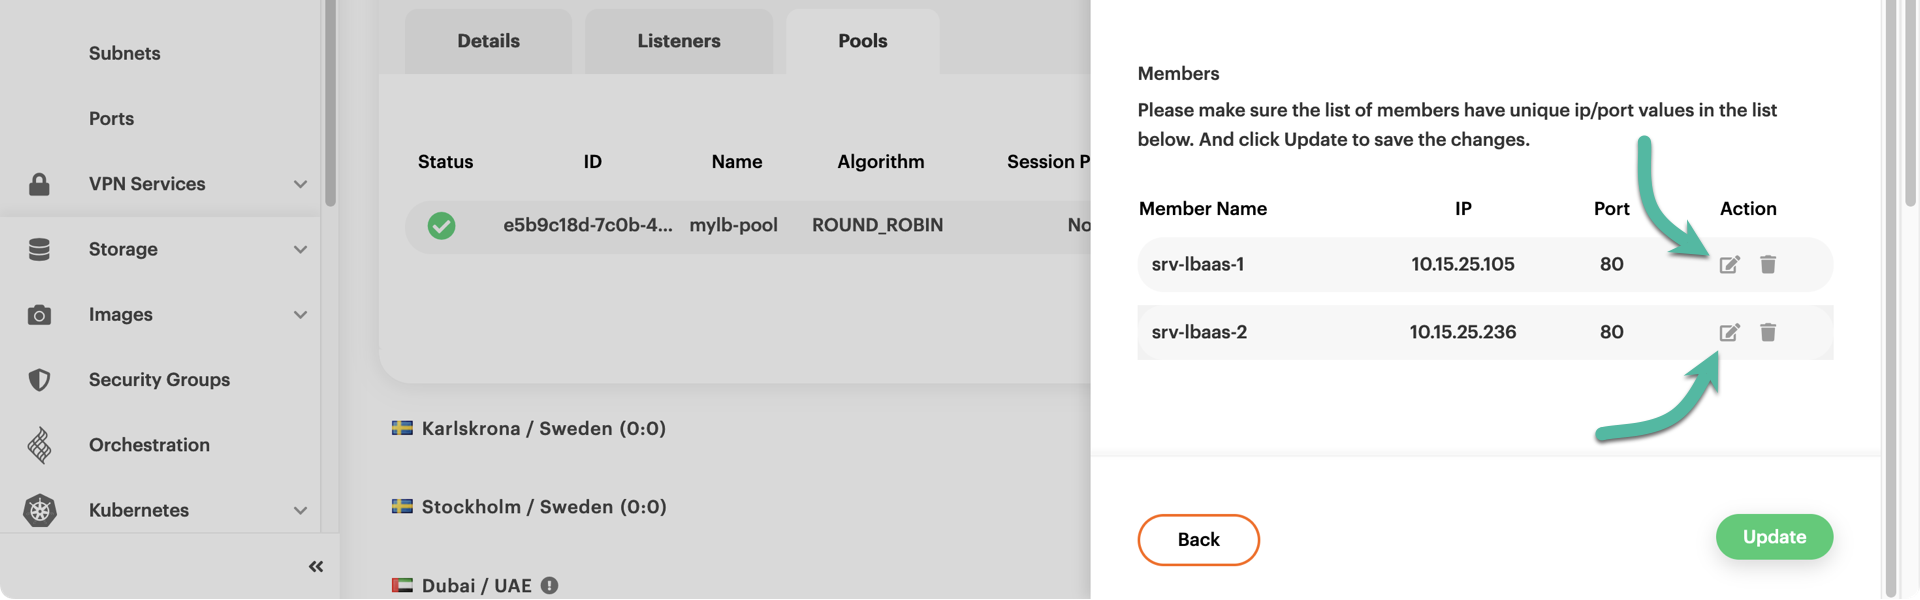
To confirm the changes, click the green Update button.
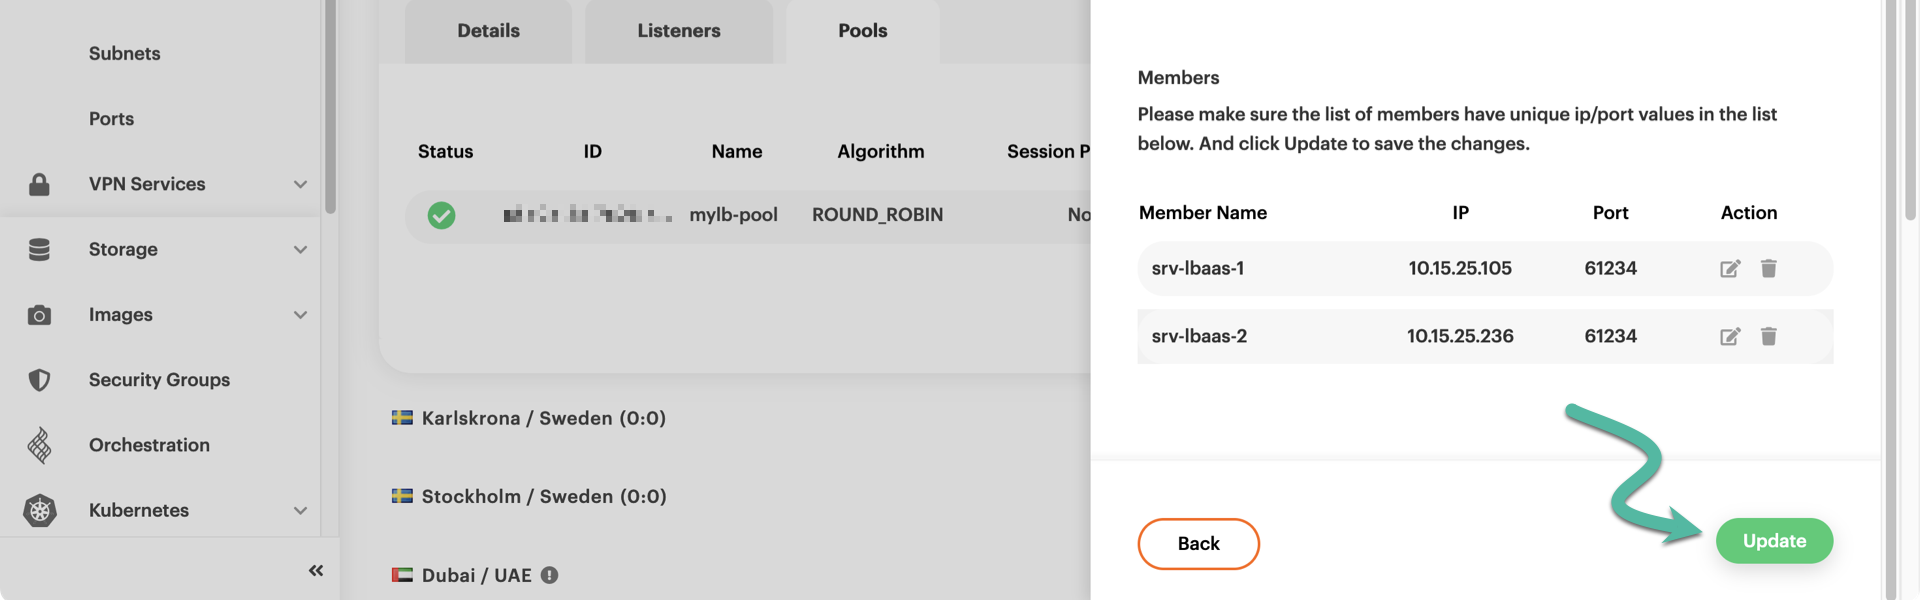
At this point, the load balancer should have its listener plus a pool with two members.
Both our test servers are in the subnet-fra1 subnet, one of them has IP 10.15.25.105, and the other one has IP 10.15.25.236.
To add those two servers in pool mylb-pool, type:
openstack loadbalancer member create \
    --subnet-id subnet-fra1 --address 10.15.25.105 \
    --protocol-port 61234 mylb-pool
+---------------------+--------------------------------------+
| Field               | Value                                |
+---------------------+--------------------------------------+
| address             | 10.15.25.105                         |
| admin_state_up      | True                                 |
| created_at          | 2023-01-16T20:11:08                  |
| id                  | 93aed0c8-b425-40b5-b166-f3e44ad9a986 |
| name                |                                      |
| operating_status    | NO_MONITOR                           |
| project_id          | dfc700467396428bacba4376e72cc3e9     |
| protocol_port       | 61234                                |
| provisioning_status | PENDING_CREATE                       |
| subnet_id           | df6fb6ca-4751-4b74-8b3e-5fbda0117cea |
| updated_at          | None                                 |
| weight              | 1                                    |
| monitor_port        | None                                 |
| monitor_address     | None                                 |
| backup              | False                                |
| tags                |                                      |
+---------------------+--------------------------------------+
openstack loadbalancer member create \
    --subnet-id subnet-fra1 --address 10.15.25.236 \
    --protocol-port 61234 mylb-pool
+---------------------+--------------------------------------+
| Field               | Value                                |
+---------------------+--------------------------------------+
| address             | 10.15.25.236                         |
| admin_state_up      | True                                 |
| created_at          | 2023-01-16T20:11:46                  |
| id                  | d15527ce-a293-4184-9da5-dcc5f7352a0c |
| name                |                                      |
| operating_status    | NO_MONITOR                           |
| project_id          | dfc700467396428bacba4376e72cc3e9     |
| protocol_port       | 61234                                |
| provisioning_status | PENDING_CREATE                       |
| subnet_id           | df6fb6ca-4751-4b74-8b3e-5fbda0117cea |
| updated_at          | None                                 |
| weight              | 1                                    |
| monitor_port        | None                                 |
| monitor_address     | None                                 |
| backup              | False                                |
| tags                |                                      |
+---------------------+--------------------------------------+
You may at any time list all members of a particular pool:
openstack loadbalancer member list mylb-pool
+------------+------+------------+---------------------+------------+---------------+------------------+--------+
| id         | name | project_id | provisioning_status | address    | protocol_port | operating_status | weight |
+------------+------+------------+---------------------+------------+---------------+------------------+--------+
| 93aed0c8-  |      | dfc7004673 | ACTIVE              | 10.15.25.1 |         61234 | NO_MONITOR       |      1 |
| b425-40b5- |      | 96428bacba |                     | 05         |               |                  |        |
| b166-      |      | 4376e72cc3 |                     |            |               |                  |        |
| f3e44ad9a9 |      | e9         |                     |            |               |                  |        |
| 86         |      |            |                     |            |               |                  |        |
| d15527ce-  |      | dfc7004673 | ACTIVE              | 10.15.25.2 |         61234 | NO_MONITOR       |      1 |
| a293-4184- |      | 96428bacba |                     | 36         |               |                  |        |
| 9da5-      |      | 4376e72cc3 |                     |            |               |                  |        |
| dcc5f7352a |      | e9         |                     |            |               |                  |        |
| 0c         |      |            |                     |            |               |                  |        |
+------------+------+------------+---------------------+------------+---------------+------------------+--------+
Assigning a floating IP
Your load balancer has an internal IP chosen from the subnet you indicated earlier. This makes it reachable from other servers in the same subnet but not from the Internet. You probably want the load balancer to be reachable from anywhere, meaning you have to equip it with a floating IP.
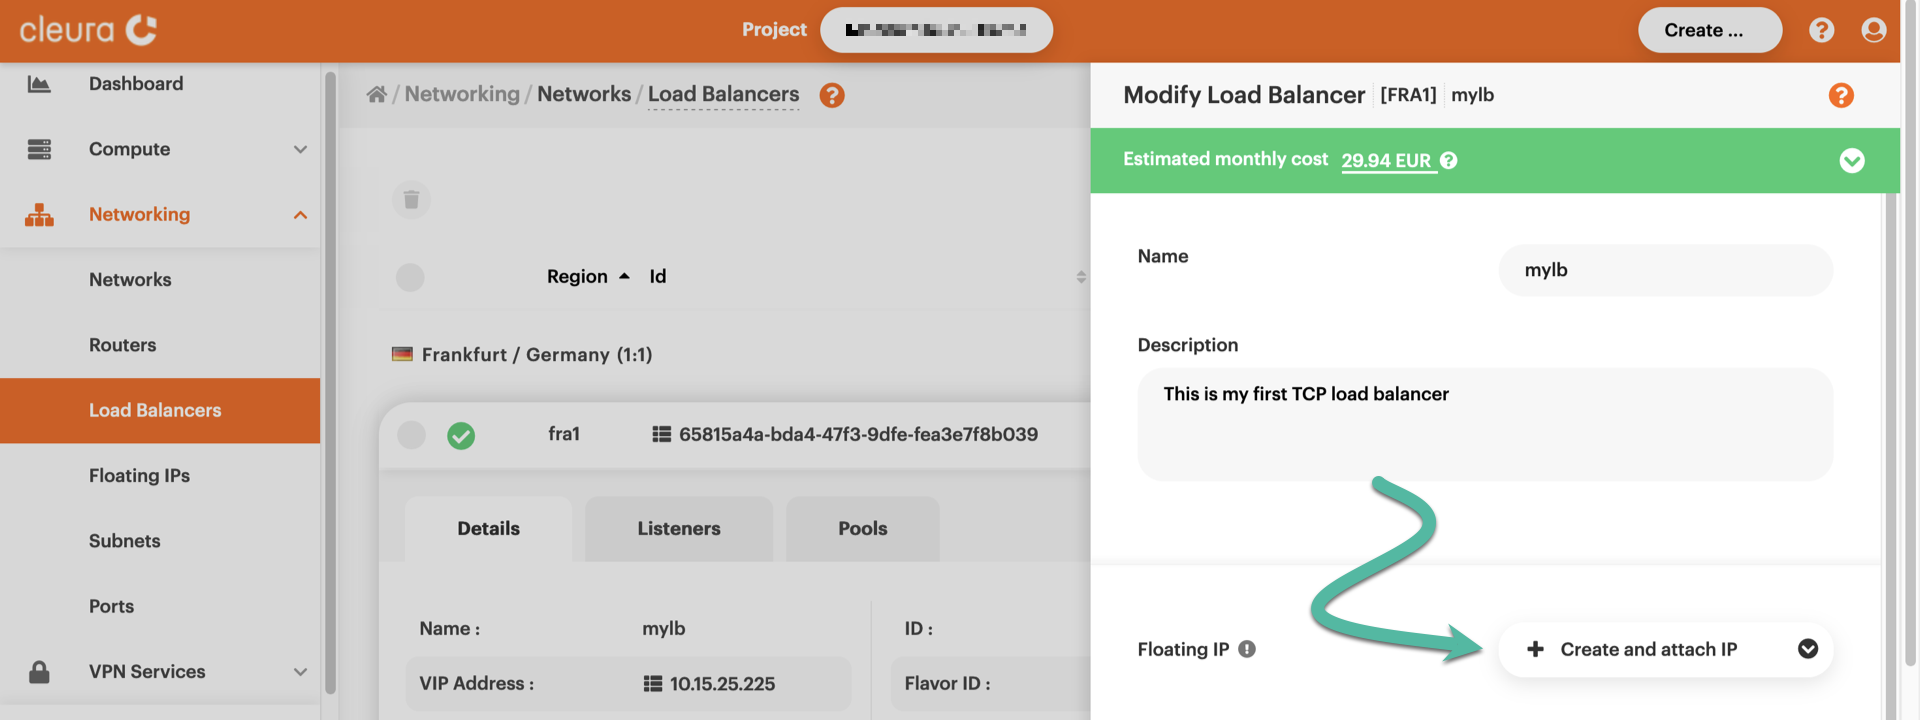
While viewing your load balancer, click the three-dot icon on the right. From the pop-up menu that appears, select Modify Load Balancer.

The Modify Load Balancer pane appears. For the Floating IP option, select Create and attach IP.
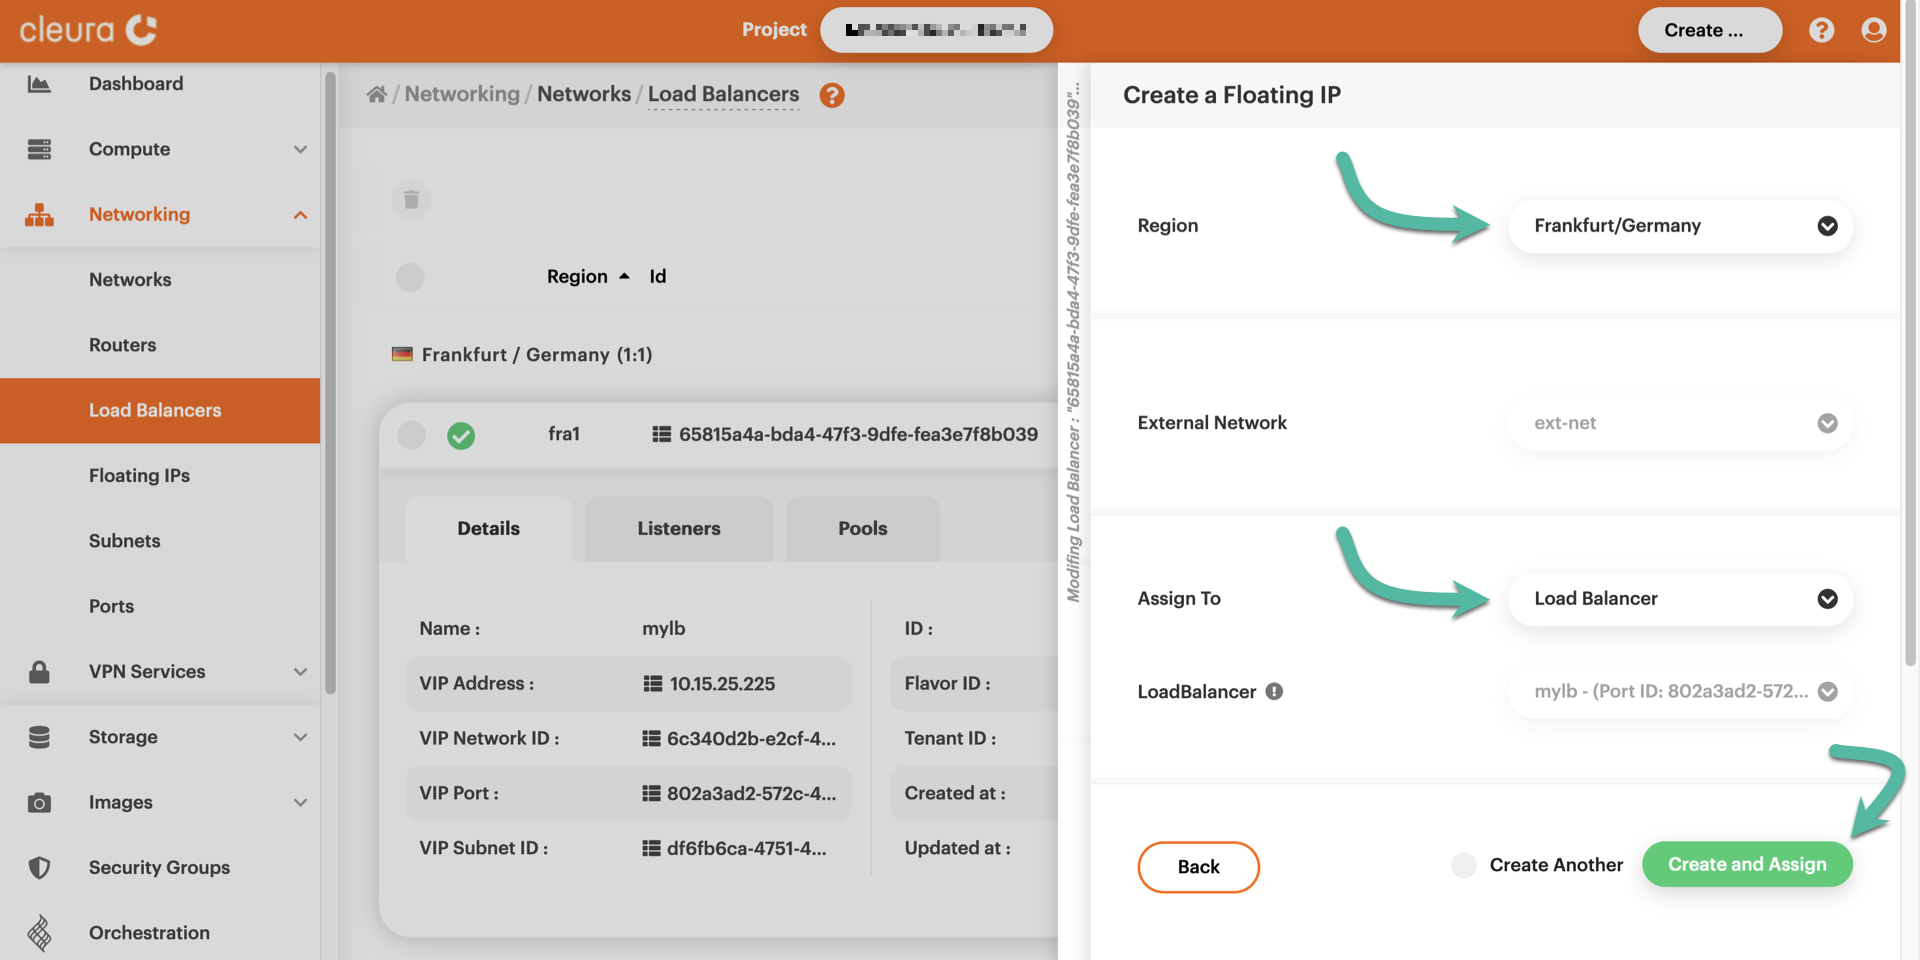
A new pane slides over, named Create a Floating IP. For the Region parameter, select the one the load balancer resides in. For the Assign to parameter, make sure you choose Load Balancer. In our example, there’s only one load balancer in the region we are working in, so the parameter Assign To is already set for us. To finalize the assignment, click the green Create and Assign button.
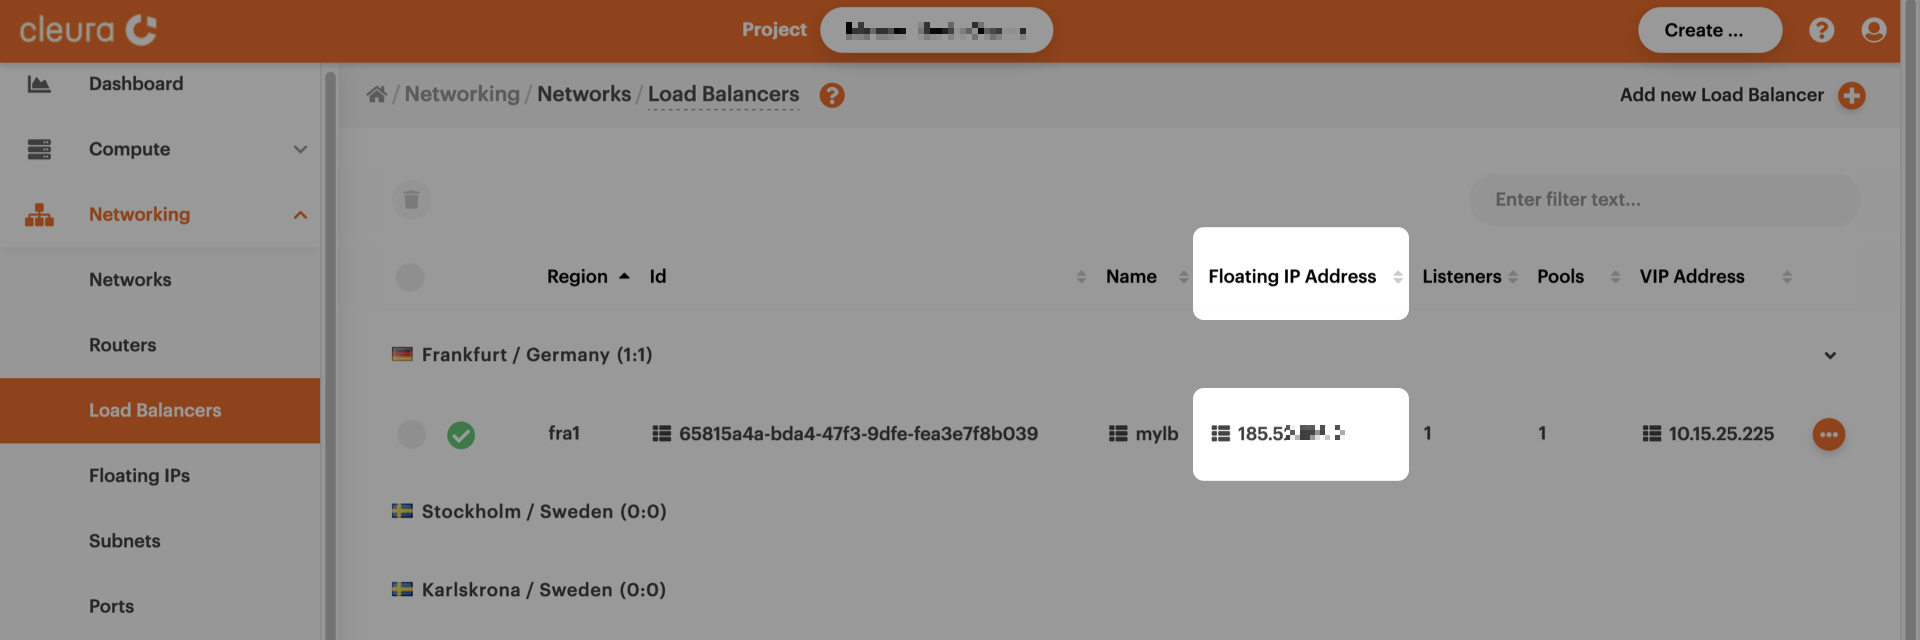
As you may see, your load balancer now has a floating IP. You can now use that to test the balancer and make sure it works as expected.
First, create a new floating IP:
openstack floating ip create ext-net
+---------------------+--------------------------------------+
| Field               | Value                                |
+---------------------+--------------------------------------+
| created_at          | 2023-01-16T20:25:25Z                 |
| description         |                                      |
| dns_domain          | None                                 |
| dns_name            | None                                 |
| fixed_ip_address    | None                                 |
| floating_ip_address | 198.51.100.129                       |
| floating_network_id | 2aec7a99-3783-4e2a-bd2b-bbe4fef97d1c |
| id                  | 69457661-197e-444a-b9ce-54394263dafa |
| name                | 198.51.100.129                       |
| port_details        | None                                 |
| port_id             | None                                 |
| project_id          | dfc700467396428bacba4376e72cc3e9     |
| qos_policy_id       | None                                 |
| revision_number     | 0                                    |
| router_id           | None                                 |
| status              | DOWN                                 |
| subnet_id           | None                                 |
| tags                | []                                   |
| updated_at          | 2023-01-16T20:25:25Z                 |
+---------------------+--------------------------------------+
Then, load the ID of the new floating IP to a variable:
FLOAT_IP_ID=$(openstack floating ip list \
    --floating-ip-address 198.51.100.129 -c ID -f value)
Do the same for the VIP port ID of your load balancer:
VIP_PORT_ID=$(openstack loadbalancer show mylb \
    -c vip_port_id -f value)
Finally, assign the floating IP to your load balancer like so:
openstack floating ip set --port $VIP_PORT_ID $FLOAT_IP_ID
Testing the load balancer
Each of the two test servers runs ncat to continuously listen on port 61234/TCP and respond to clients with a simple message, revealing its hostname:
ncat -kv -l 61234 -c 'echo Yello from $(hostname)!'
Since the load balancer has a floating IP (198.51.100.129, in our example), and we know the port it listens to, we can try connecting to it via wget and see what happens:
wget -q 198.51.100.129:61234 -O -
Yello from srv-lbaas-1!
It looks like we talked to the first test server.
If we run the exact same wget command for a second time, since the load balancer distributes client connection requests in a round-robin fashion, we expect to talk to the second server:
wget -q 198.51.100.129:61234 -O -
Yello from srv-lbaas-2!
During our testing, executing the wget command repeatedly, we were getting those two hostnames one after the other — and that was proof our TCP load balancer was working as expected.
But there is one more expectation of any load balancer: the ability to skip backend hosts when they are inaccessible.
To test our load balancer in this new scenario, let us first use wget to connect to port 61234 and jot down the backend server that will respond:
wget -q 198.51.100.129:61234 -O -
Yello from srv-lbaas-2!
We see that srv-lbaas-2 responded. That means the next time we try to connect, srv-lbaas-1 will respond.
But if we SSH into srv-lbaas-1 and terminate ncat, then after connecting with wget we will get a response from srv-lbaas-2 — again.
This, at least, is our expectation.
So without further ado, we SSH into srv-lbaas-1, we terminate ncat, we log out, and from our local terminal, we type:
wget -q 198.51.100.129:61234 -O -
Yello from srv-lbaas-2!
Exactly as we expected, srv-lbaas-2 has responded again, proving our load balancer behaves correctly.
As an exercise, you might want to shutdown your srv-lbaas-1 and/or re-enable ncat, and check the behavior of the load balancer.
There should be no surprises.
Adding a health monitor
You can add a health monitor to the pool of your load balancer, so whenever —and for whatever reason— one or more of the pool member services are inaccessible, the load balancer will know and won’t even bother trying to redirect client requests to them. Of course, whenever an inaccessible service gets accessible again, the load balancer will take notice and start treating the corresponding pool member as a fully functional server.
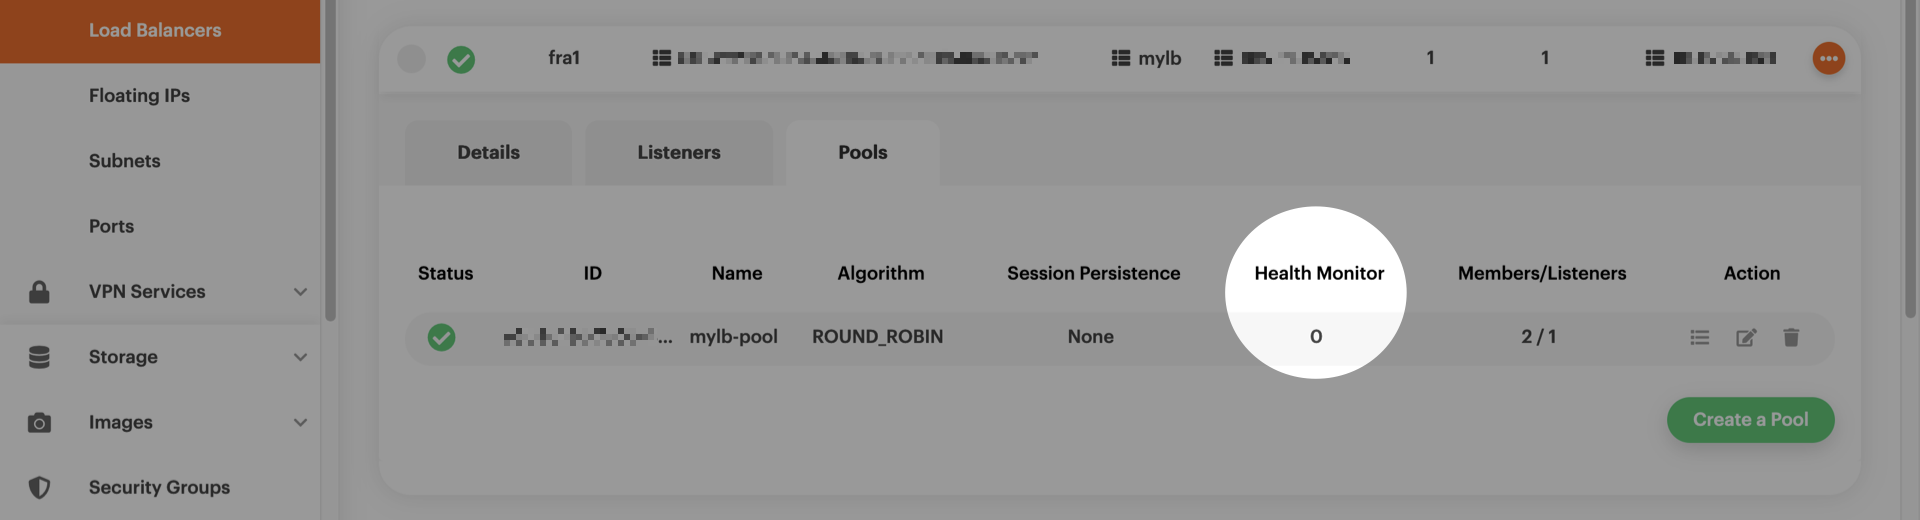
In the detailed view of your load balancer, pull up the Pools tab. In the Health Monitor column there is a “0”, for the pool has no health monitor yet.
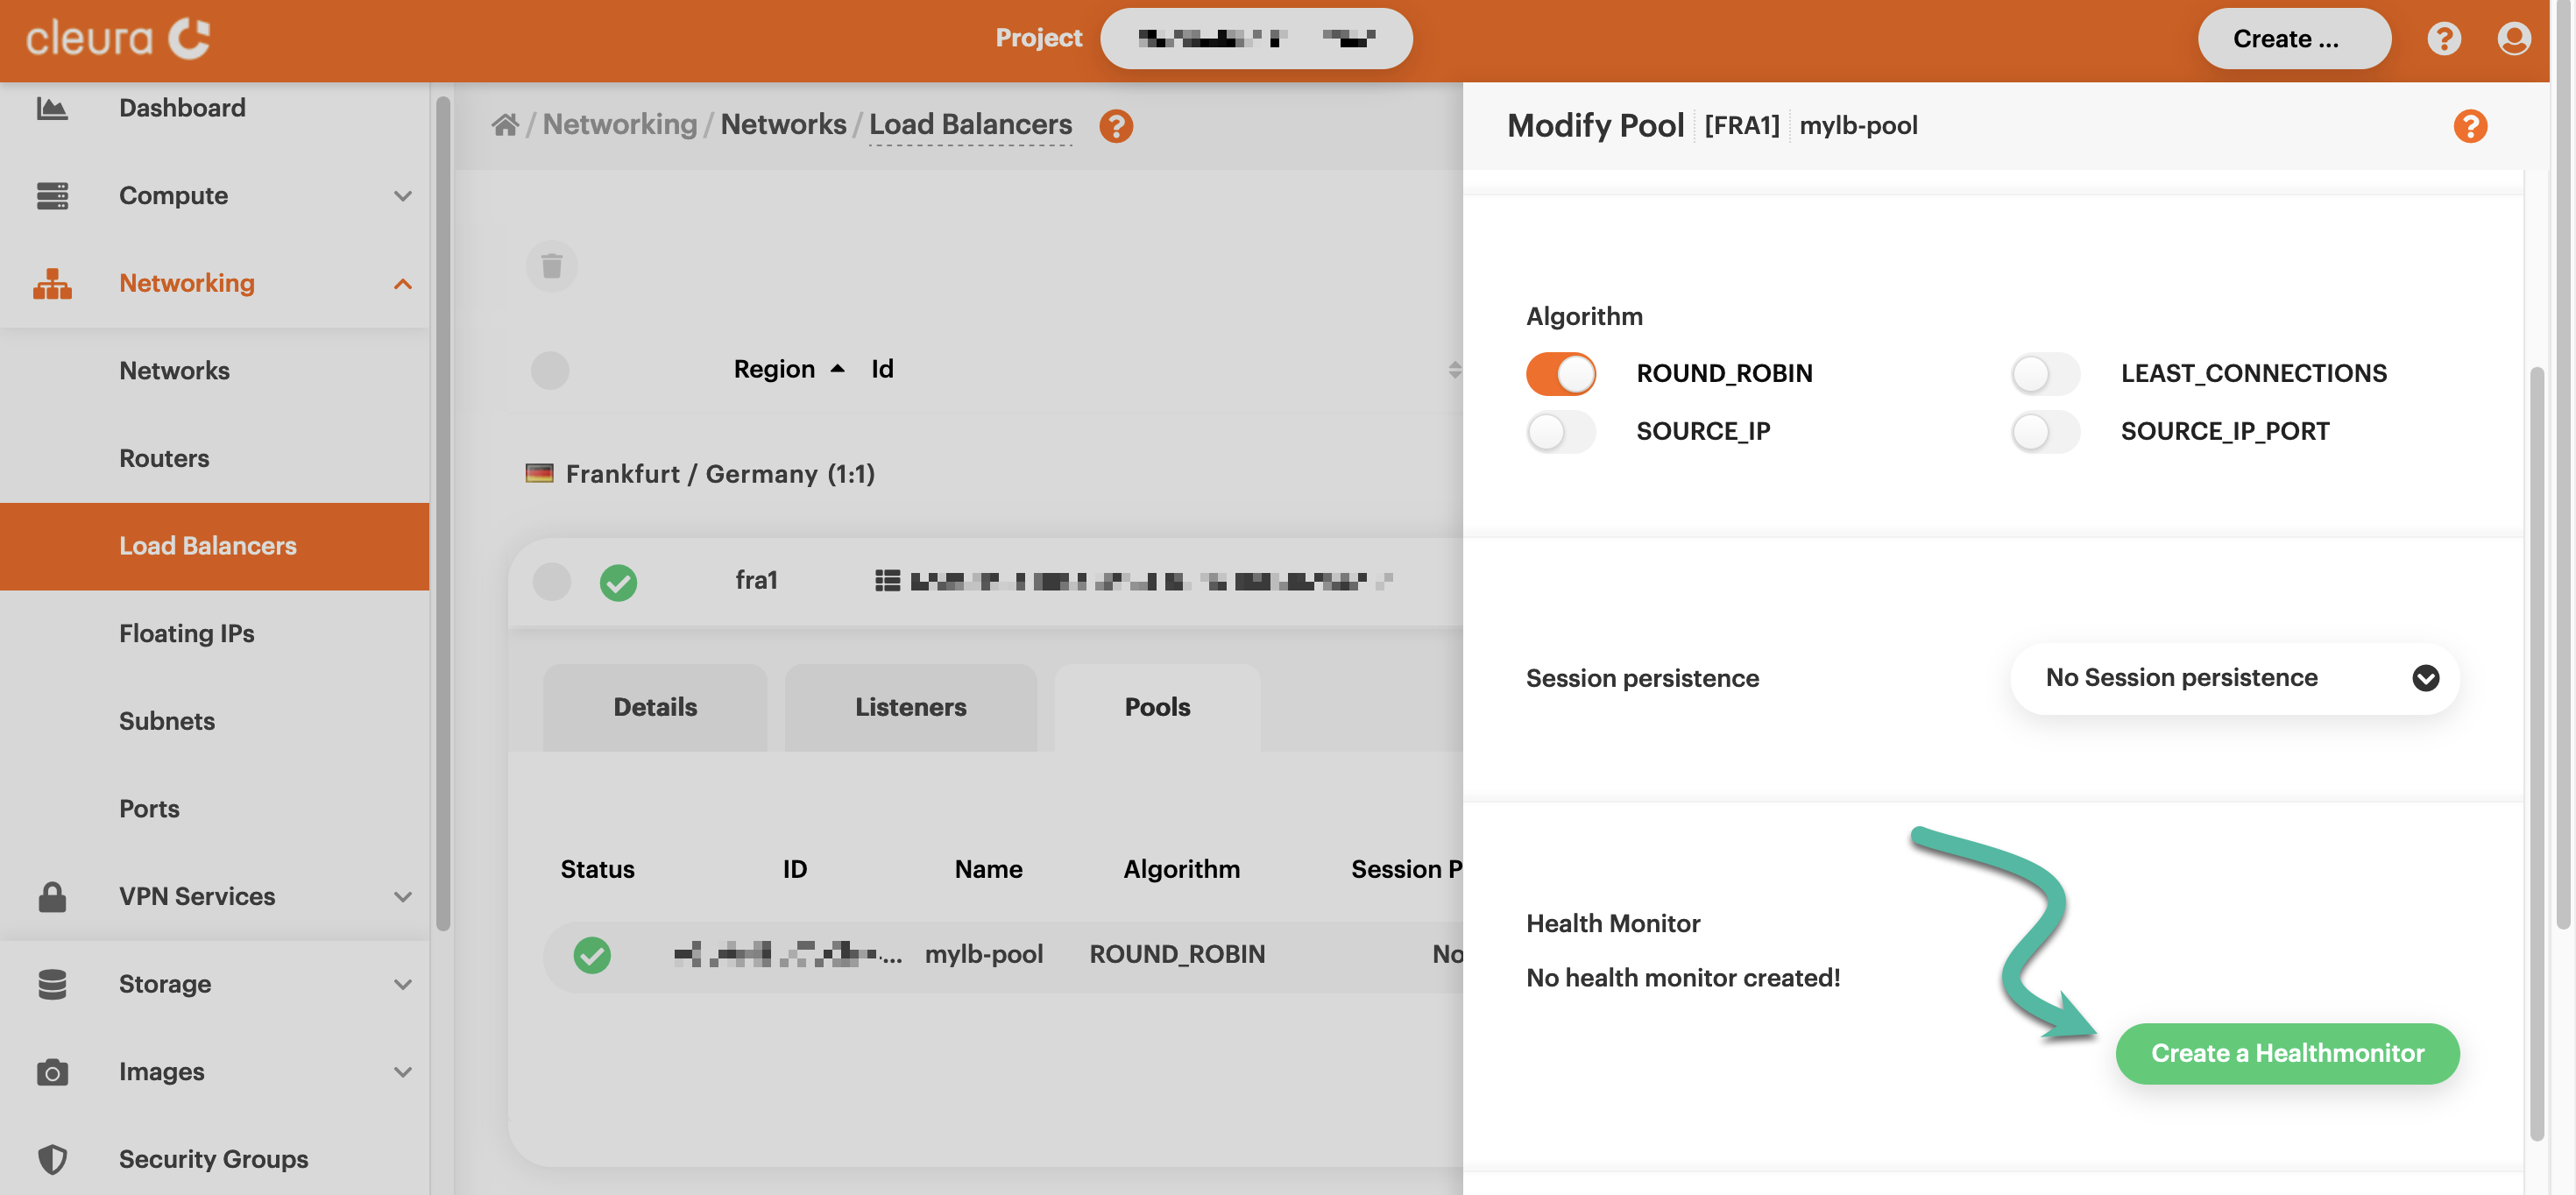
To add a health monitor, click the notepad-and-pen icon. A pane titled Modify Pool slides over. Scroll down if you have to, and stop when the Health Monitor section is fully visible. You will see a message saying, “No health monitor created”, so click the green Create a Healthmonitor button to create one.
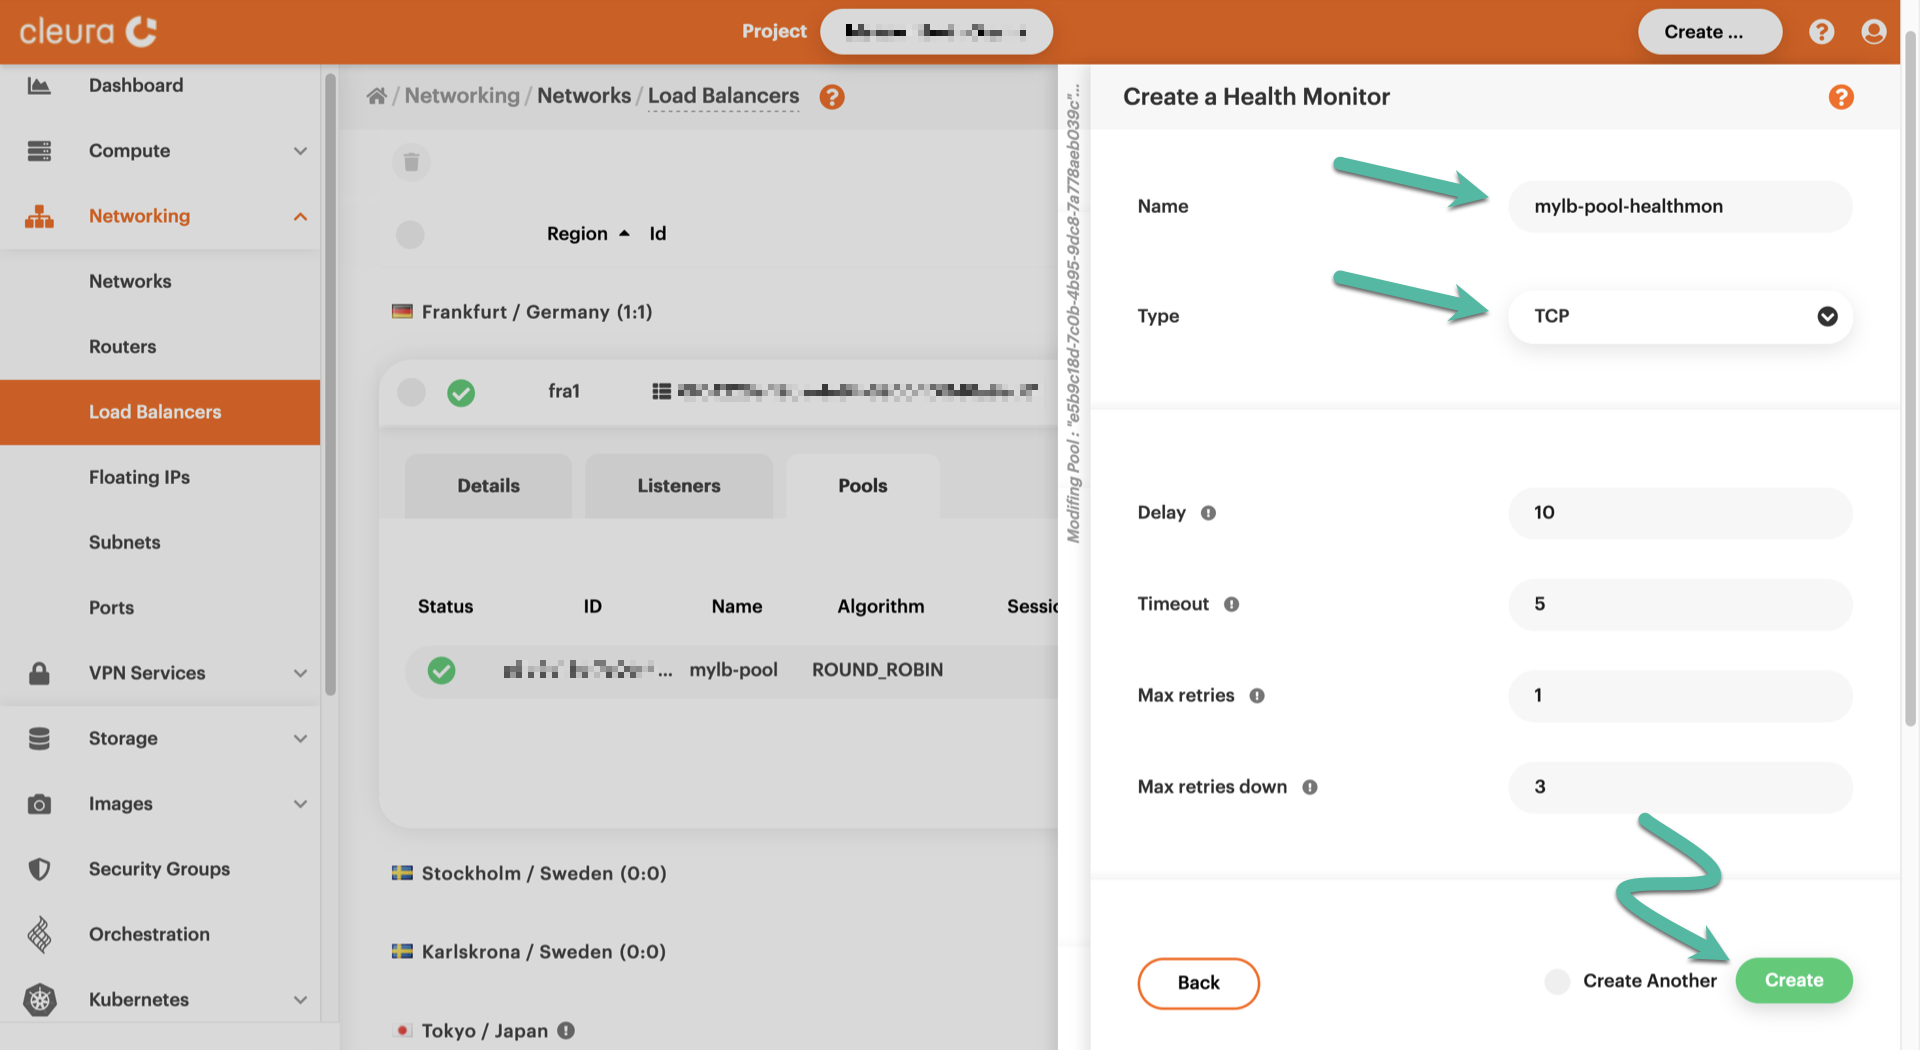
Pick a name for the new health monitor, and set its type to TCP. That is the connection protocol that will be used to determine whether pool member services are accessible. Finalize your choices with a click on the green Create button.
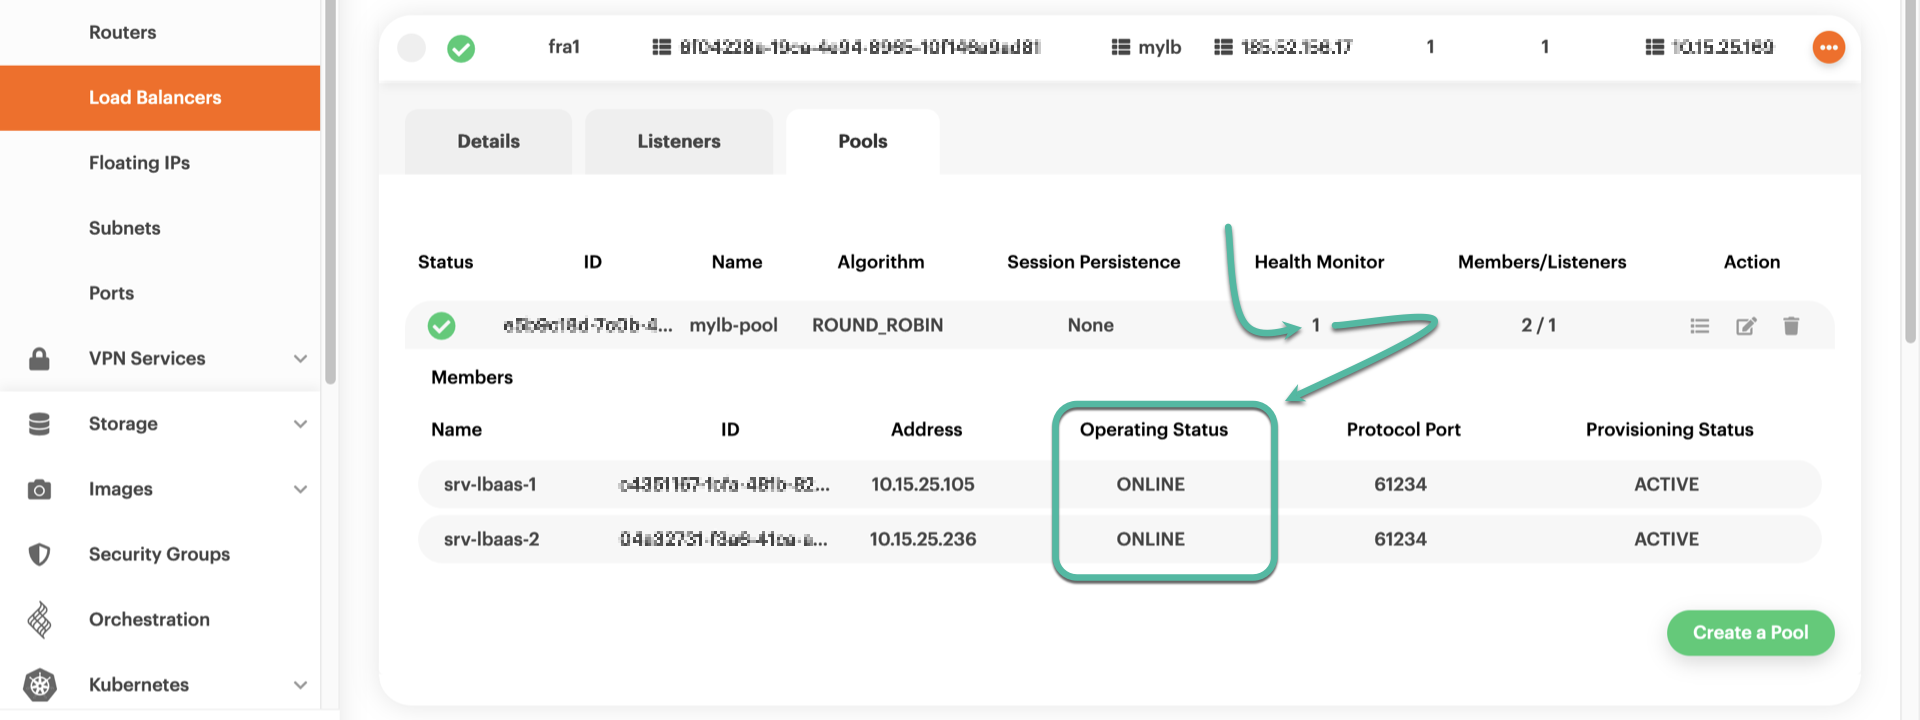
You will then see that in the Health Monitor column there is a “1” — and that means the monitor is active. To see real-time information regarding pool members operating status, click over “1”.
To create a health monitor for pool mylb-pool of load balancer mylb, type something like the following:
openstack loadbalancer healthmonitor create \
    --name=mylb-pool-healthmon --type=TCP \
    --delay=10 --timeout=5 --max-retries=1 \
    mylb-pool
+---------------------+--------------------------------------+
| Field               | Value                                |
+---------------------+--------------------------------------+
| project_id          | dfc700467396428bacba4376e72cc3e9     |
| name                | mylb-pool-healthmon                  |
| admin_state_up      | True                                 |
| pools               | e5b9c18d-7c0b-4b95-9dc8-7a778aeb039c |
| created_at          | 2023-01-22T20:22:05                  |
| provisioning_status | PENDING_CREATE                       |
| updated_at          | None                                 |
| delay               | 10                                   |
| expected_codes      | None                                 |
| max_retries         | 1                                    |
| http_method         | None                                 |
| timeout             | 5                                    |
| max_retries_down    | 3                                    |
| url_path            | None                                 |
| type                | TCP                                  |
| id                  | 8e720877-969d-4653-9e7e-1ae2df66a0b6 |
| operating_status    | OFFLINE                              |
| http_version        | None                                 |
| domain_name         | None                                 |
| tags                |                                      |
+---------------------+--------------------------------------+
The name of the new health monitor is mylb-pool-healthmon, and the TCP protocol will be used to check whether members of pool mylb-pool are online or offline.
To check the provisioning status of the health monitor, type:
openstack loadbalancer healthmonitor show \
    mylb-pool-healthmon -c provisioning_status
+---------------------+--------+
| Field               | Value  |
+---------------------+--------+
| provisioning_status | ACTIVE |
+---------------------+--------+
Once the health monitor is provisioned, you may at any time check the pool members status like so:
openstack loadbalancer member list mylb-pool
+-----------+-----------+------------+---------------------+-----------+---------------+------------------+--------+
| id        | name      | project_id | provisioning_status | address   | protocol_port | operating_status | weight |
+-----------+-----------+------------+---------------------+-----------+---------------+------------------+--------+
| c4351167- | srv-      | dfc7004673 | ACTIVE              | 10.15.25. |         61234 | ONLINE           |      1 |
| fcfa-     | lbaas-1   | 96428bacba |                     | 105       |               |                  |        |
| 48fb-     |           | 4376e72cc3 |                     |           |               |                  |        |
| 82ac-     |           | e9         |                     |           |               |                  |        |
| 76ddfdc73 |           |            |                     |           |               |                  |        |
| ca2       |           |            |                     |           |               |                  |        |
| 04a32731- | srv-      | dfc7004673 | ACTIVE              | 10.15.25. |         61234 | ONLINE           |      1 |
| f3a6-     | lbaas-2   | 96428bacba |                     | 236       |               |                  |        |
| 41ca-     |           | 4376e72cc3 |                     |           |               |                  |        |
| a638-     |           | e9         |                     |           |               |                  |        |
| 6f8767437 |           |            |                     |           |               |                  |        |
| 50c       |           |            |                     |           |               |                  |        |
+-----------+-----------+------------+---------------------+-----------+---------------+------------------+--------+
Observing and testing the monitor
Having a health monitor for your load balancer’s pool up and running, whenever the service of interest in any of the pool members gets inaccessible, the monitor notices and immediately considers the corresponding member as offline.
From then on, and until the same service gets accessible again, the load balancer does not even try to redirect client connections to the affected member.
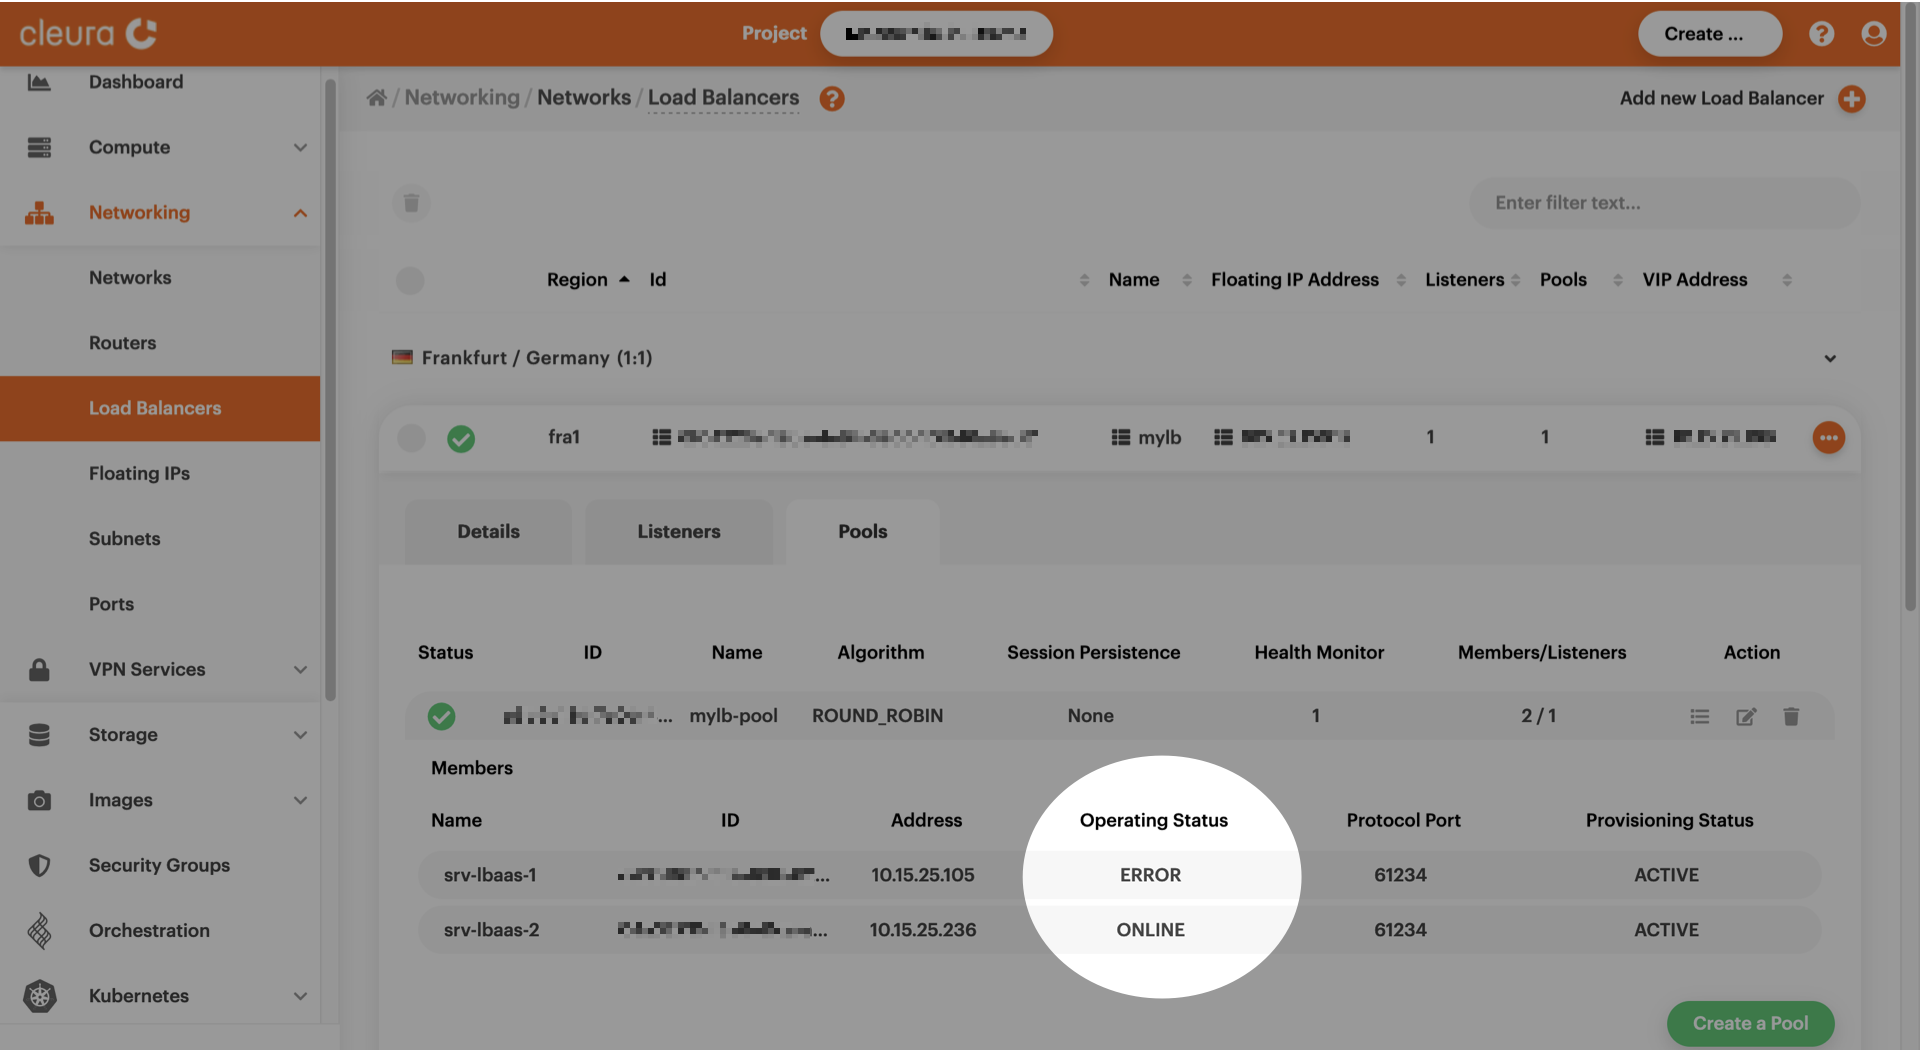
During our testing, we killed ncat running on srv-lbaas-1, and then took a look at the health monitor from the Cleura Cloud Management Panel — and also from a local terminal.
In the detailed view of your load balancer, pull up the Pools tab and click anywhere on its line. After a second or two, you will see information regarding all pool members. Pay attention to the Operating Status column, where you can see the status of any of the pool members.
To check the operating status of any of the pool members of your load balancer, type something like this:
openstack loadbalancer member list mylb-pool
+-----------+-----------+------------+---------------------+-----------+---------------+------------------+--------+
| id        | name      | project_id | provisioning_status | address   | protocol_port | operating_status | weight |
+-----------+-----------+------------+---------------------+-----------+---------------+------------------+--------+
| c4351167- | srv-      | dfc7004673 | ACTIVE              | 10.15.25. |         61234 | ERROR            |      1 |
| fcfa-     | lbaas-1   | 96428bacba |                     | 105       |               |                  |        |
| 48fb-     |           | 4376e72cc3 |                     |           |               |                  |        |
| 82ac-     |           | e9         |                     |           |               |                  |        |
| 76ddfdc73 |           |            |                     |           |               |                  |        |
| ca2       |           |            |                     |           |               |                  |        |
| 04a32731- | srv-      | dfc7004673 | ACTIVE              | 10.15.25. |         61234 | ONLINE           |      1 |
| f3a6-     | lbaas-2   | 96428bacba |                     | 236       |               |                  |        |
| 41ca-     |           | 4376e72cc3 |                     |           |               |                  |        |
| a638-     |           | e9         |                     |           |               |                  |        |
| 6f8767437 |           |            |                     |           |               |                  |        |
| 50c       |           |            |                     |           |               |                  |        |
+-----------+-----------+------------+---------------------+-----------+---------------+------------------+--------+
In the example above, see the operating_status column, specifically the status of server srv-lbaas-1.
Regarding the operating status of all pool members, you can always limit the scope of your query like so:
openstack loadbalancer member list mylb-pool \
    -c name -c operating_status
+-------------+------------------+
| name        | operating_status |
+-------------+------------------+
| srv-lbaas-1 | ERROR            |
| srv-lbaas-2 | ONLINE           |
+-------------+------------------+
Finally, let us see what happens when we repeatedly try to access the remote service via the load balancer:
$ wget -q 198.51.100.129:61234 -O -
Yello from srv-lbaas-2!

$ wget -q 198.51.100.129:61234 -O -
Yello from srv-lbaas-2!

$ wget -q 198.51.100.129:61234 -O -
Yello from srv-lbaas-2!
Since pool member srv-lbaas-1 is offline to the health monitor, we keep getting an answer from srv-lbaas-2.
Actually, while the service of interest in srv-lbaas-1 is inaccessible, then no matter how many times we run the command above we will keep getting a response from srv-lbaas-2 only.