Creating a Kubernetes cluster
By employing OpenStack Magnum you can create Kubernetes clusters via OpenStack, using the Cleura Cloud Management Panel or the OpenStack CLI.
Prerequisites
First and foremost, you need an account in Cleura Cloud.
Should you choose to work from your terminal, you will also need to enable the OpenStack CLI.
In that case, in addition to the Python openstackclient module, make sure you also install the corresponding plugin module for Magnum.
Use either the package manager of your operating system or pip:
apt install python3-magnumclient
This Python module is unavailable via brew, but you can install it via pip.
pip install python-magnumclient
Creating a Kubernetes cluster
Fire up your favorite web browser, navigate to the Cleura Cloud Management Panel start page, and log into your Cleura Cloud account. On the top right-hand side of the Cleura Cloud Management Panel, click the Create button. A new pane titled Create slides into view.
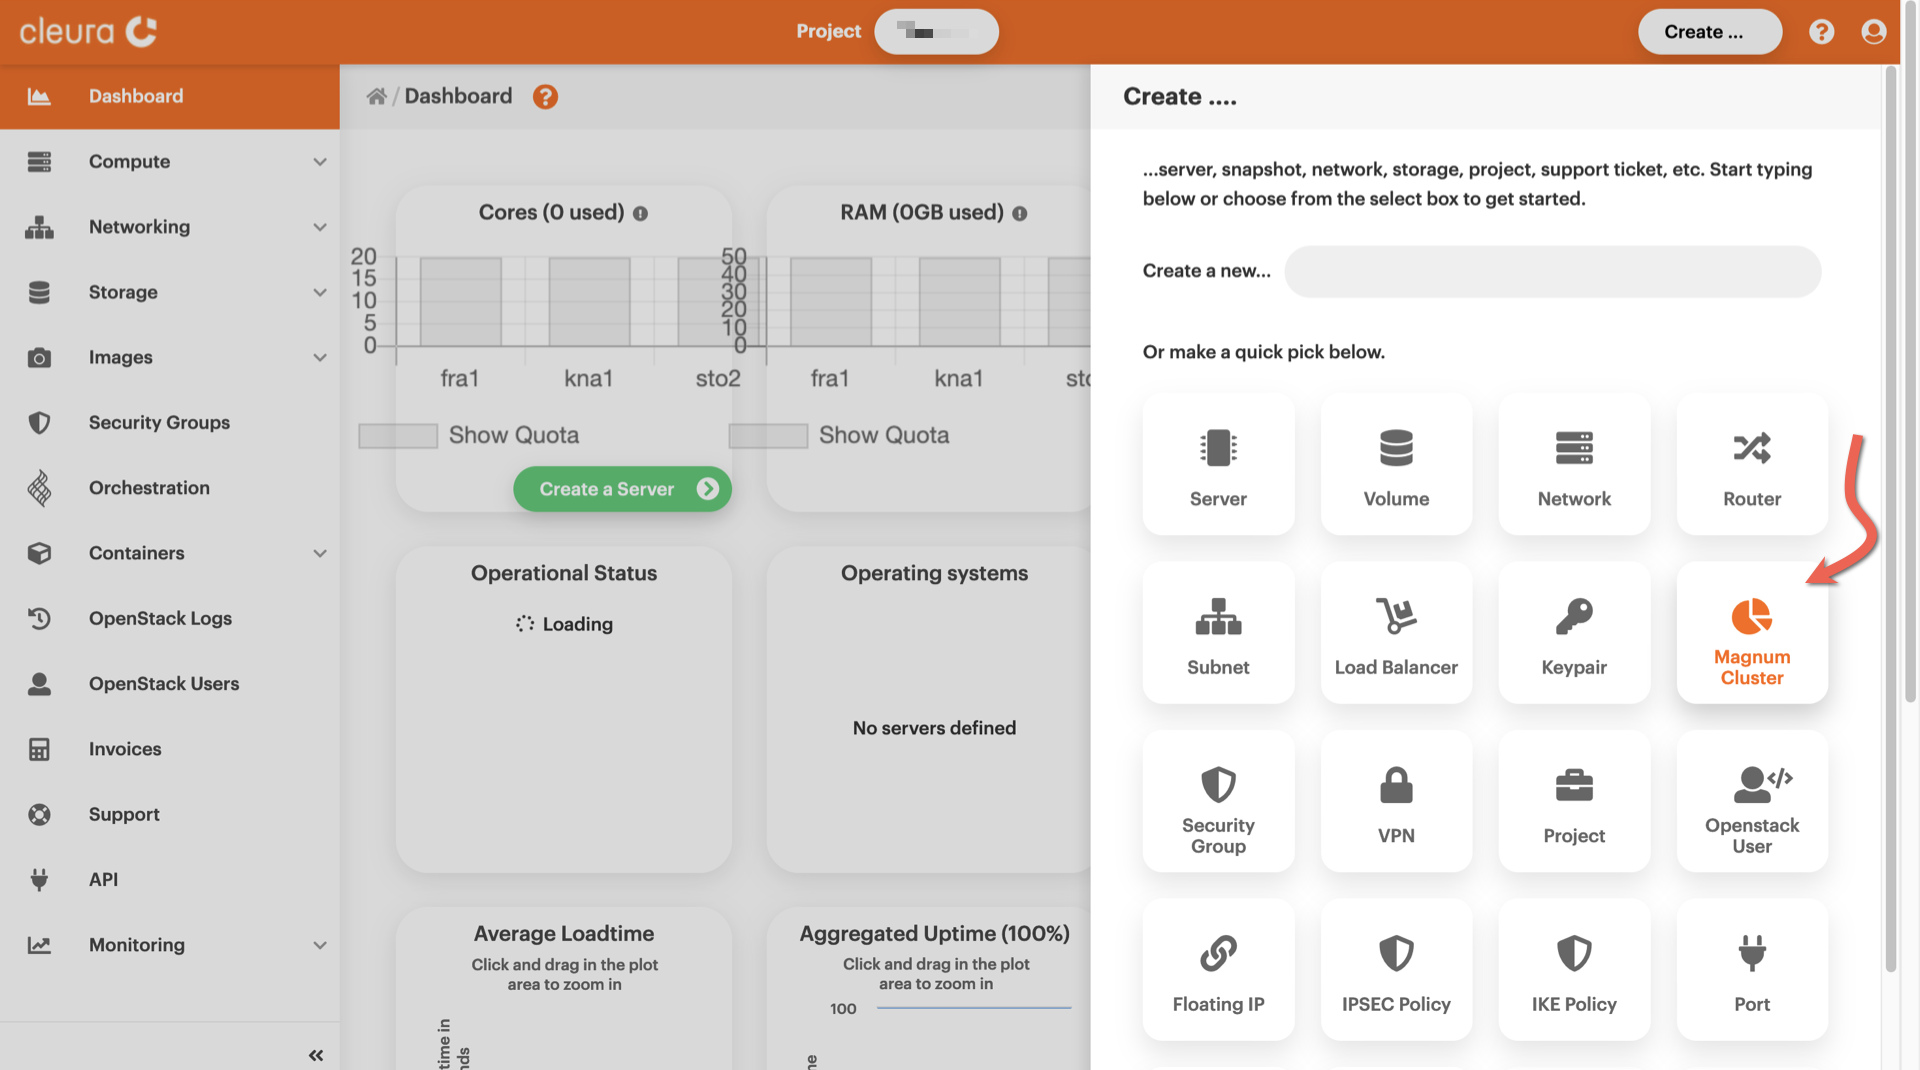
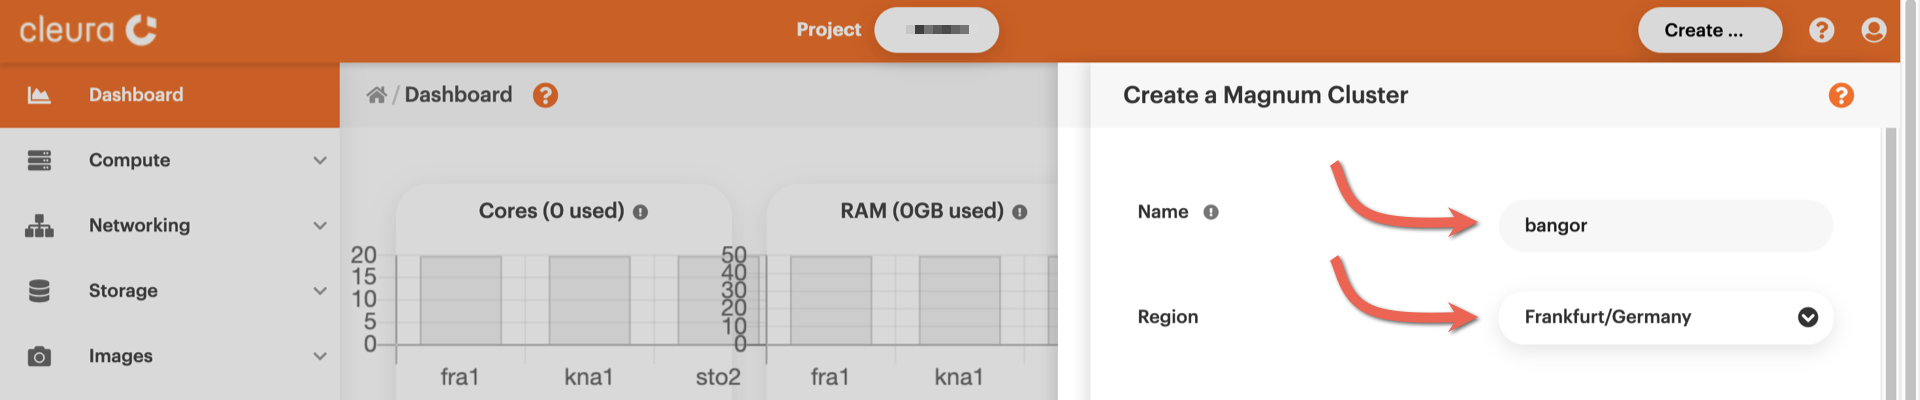
You will notice several rounded boxes on that pane, each for defining, configuring, and instantiating a different Cleura Cloud object. Go ahead and click the Magnum Cluster box. A new vertical pane titled Create a Magnum Cluster slides over. At the top, type in a name for the new cluster and select one of the available regions.
A bit further below, use the drop-down menus to select a template and a keypair for the cluster nodes. Notice the Docker volume size option which, by default, is set to 50 GiB. This pertains to the size of the extra block device each cluster node will have. That whole storage capacity will be used for saving persistent data. If you believe the default size is too much or too little, change it accordingly. Unless you want to define the number of master nodes or the number of worker nodes, click the green Create button now.
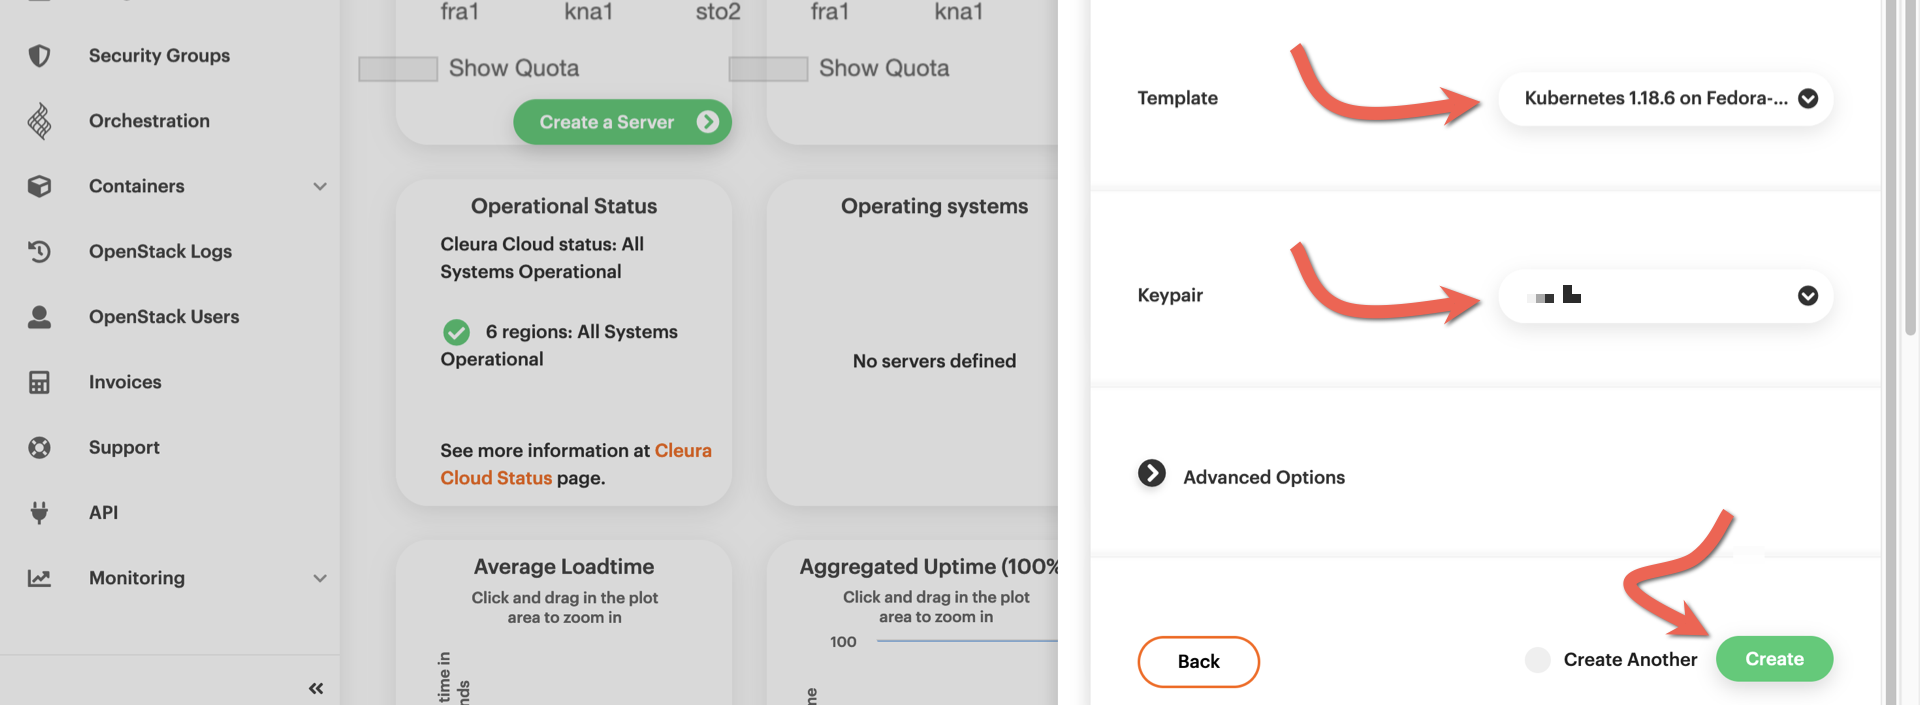
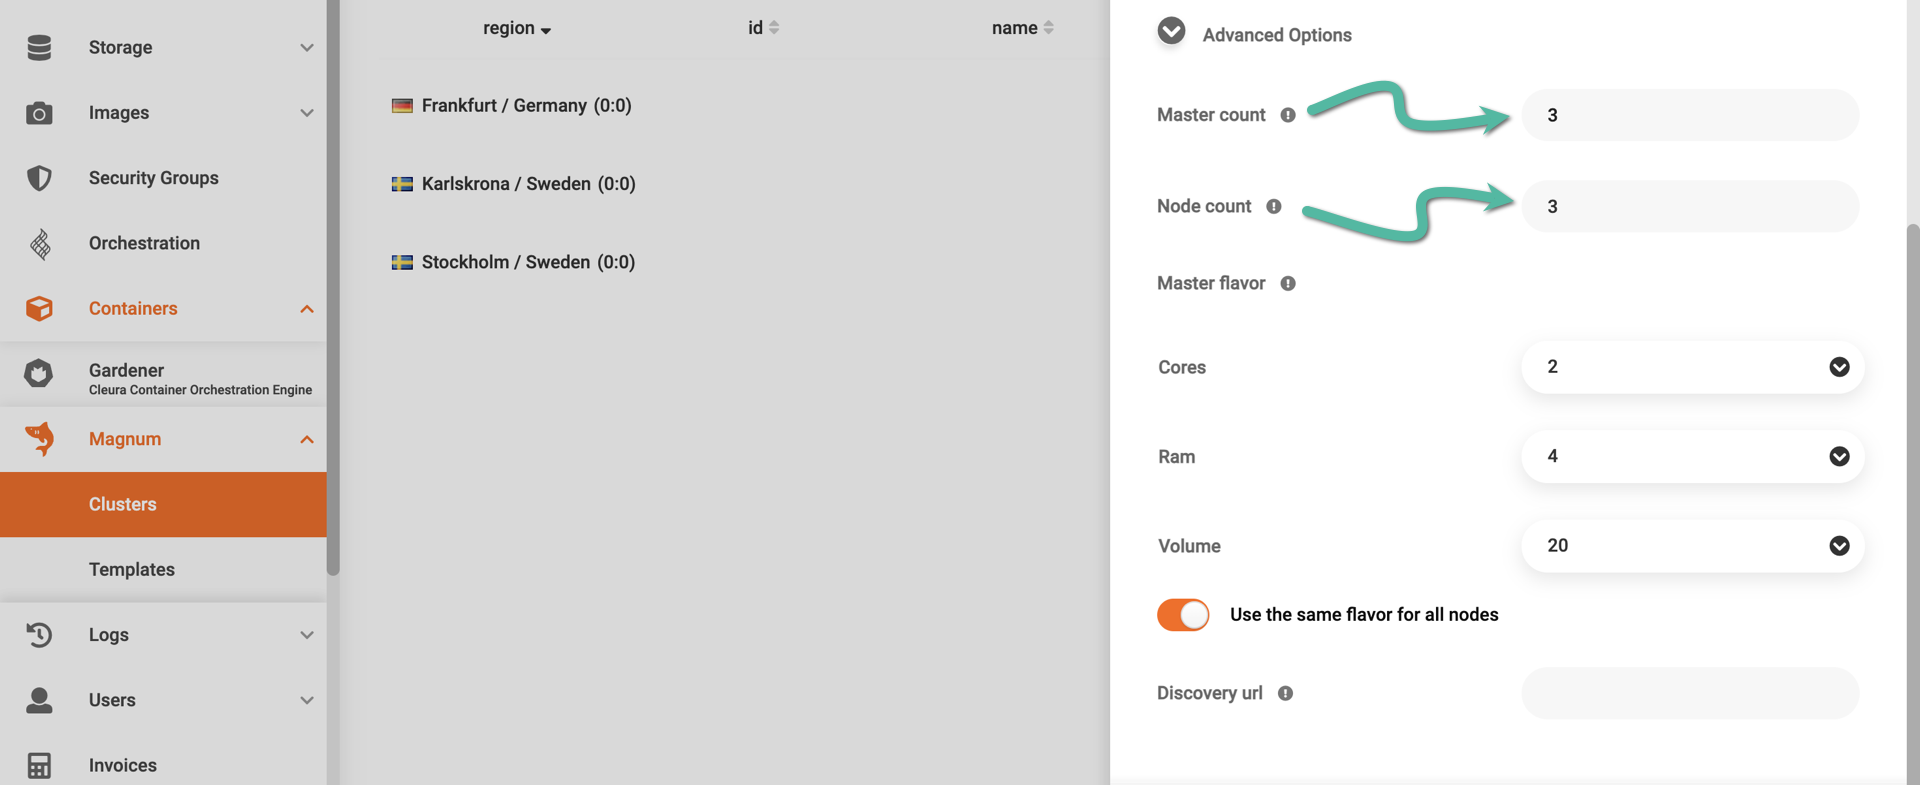
If you do want to play with the aforementioned parameters, then before clicking the Create button go ahead and expand the Advanced Options section. Since the new cluster templates come with the master load balancer enabled by default, you might want to equip your new cluster with 3 master nodes. Optionally, increase the number of worker nodes from 1 (the default) to, say, 3. Contrary to the number of master nodes, you may change the number of worker nodes after the cluster is created.
When the cluster creation process begins, please keep in mind that it takes some time to complete. While waiting, bring the vertical pane on the left-hand side of the Cleura Cloud Management Panel in full view, select Magnum → Clusters, and in the main pane, take a look at the creation progress. You can tell when the whole process is complete by the animated icon at the left of the cluster row.
A simple, general command for creating a new Kubernetes cluster with Magnum looks like this:
openstack coe cluster create \
    --cluster-template $CLUSTER_TMPL \
    --keypair $KEYPAIR \
    --docker-volume-size $PERSIST_VOL_SIZE \
    $CLUSTER_NAME
First, list all available templates in the region:
$ openstack coe cluster template list
+--------------------------------------+---------------------------------------------+------+
| uuid                                 | name                                        | tags |
+--------------------------------------+---------------------------------------------+------+
| 3f476f01-b3de-4687-a188-6829ed947db0 | Kubernetes 1.15.5 on Fedora-atomic 29       | None |
|                                      | 4C-8GB-20GB No Master LB                    |      |
| c458f02d-54b0-4ef8-abbc-e1c25b61165a | Kubernetes 1.15.5 on Fedora-atomic 29       | None |
|                                      | 2C-4GB-20GB No Master LB                    |      |
| f9e1a2ea-b1ff-43e7-8d1e-6dd5861b82cf | Kubernetes 1.18.6 on Fedora-coreos 33       | None |
|                                      | 2C-4GB-20GB No Master LB                    |      |
| 59bd894b-0f5f-4a6e-98d3-a3eb7040faab | Kubernetes v1.23.3 on Fedora-coreos 35      | None |
| 9ca03308-996e-4eaa-b507-5730dcc19fcc | Kubernetes v1.24.16 on Fedora-coreos 37     | None |
+--------------------------------------+---------------------------------------------+------+
Select the template you want by setting the corresponding name value to the CLUSTER_TMPL variable:
$ CLUSTER_TMPL="Kubernetes v1.24.16 on Fedora-coreos 37"
Then, list all available keypairs…
$ openstack keypair list
+----------+-------------------------------------------------+------+
| Name     | Fingerprint                                     | Type |
+----------+-------------------------------------------------+------+
| lefkanti | e7:e9:c5:95:ee:7b:72:37:3c:89:c5:fc:6e:8c:a1:72 | ssh  |
+----------+-------------------------------------------------+------+
…and set the KEYPAIR variable to the Name of the keypair you want:
$ KEYPAIR="lefkanti" # this is just an example
Besides the OS disk, all cluster nodes have an extra disk for permanently storing application data.
The size of this extra disk is specified during cluster creation via the --docker-volume-size parameter.
Staying loyal to the theme of setting parameters via shell variables, decide on the size of this extra volume like so:
$ PERSIST_VOL_SIZE=50
The size is expressed in Gibibytes, and in the example above, we decided to go with a 50GiB extra volume. Finally, decide on a name for your new Kubernetes cluster:
$ CLUSTER_NAME="bangor"
With everything in place, go ahead and create your new Kubernetes cluster like so:
$ openstack coe cluster create \
    --cluster-template "$CLUSTER_TMPL" \
    --keypair $KEYPAIR \
    --docker-volume-size $PERSIST_VOL_SIZE \
    $CLUSTER_NAME
New Magnum clusters start with 1 master node and 1 worker node by default. Since the new cluster templates have the master load balancer enabled, you might want to give your cluster 3 master nodes from the get-go. Optionally, you can increase the number of worker nodes from 1 to 3 or to 5. Contrary to the number of master nodes, you can always change the number of worker nodes after the cluster is created. So, to start the new cluster with 3 master nodes and 5 worker nodes, type the following:
$ openstack coe cluster create \
    --cluster-template "$CLUSTER_TMPL" \
    --keypair $KEYPAIR \
    --docker-volume-size $PERSIST_VOL_SIZE \
    --master-count 3 \
    --node-count 3 \
    $CLUSTER_NAME
In any case, if everything went well with your request for a new cluster, on the terminal, you will see a message like the following:
Request to create cluster 7ca7838a-aa33-4259-8784-02e5941a2cf0 accepted
The cluster creation process takes some time to complete, and while you are waiting, you can check if everything is progressing smoothly:
$ openstack coe cluster list -c status
+--------------------+
| status             |
+--------------------+
| CREATE_IN_PROGRESS |
+--------------------+
If everything is going well, the message you will get will be CREATE_IN_PROGRESS.
When Magnum has finished creating the cluster, the message will be CREATE_COMPLETE.
$ openstack coe cluster list -c status
+-----------------+
| status          |
+-----------------+
| CREATE_COMPLETE |
+-----------------+
Viewing the Kubernetes cluster
After the Kubernetes cluster is ready, you may at any time view it and get detailed information about it.
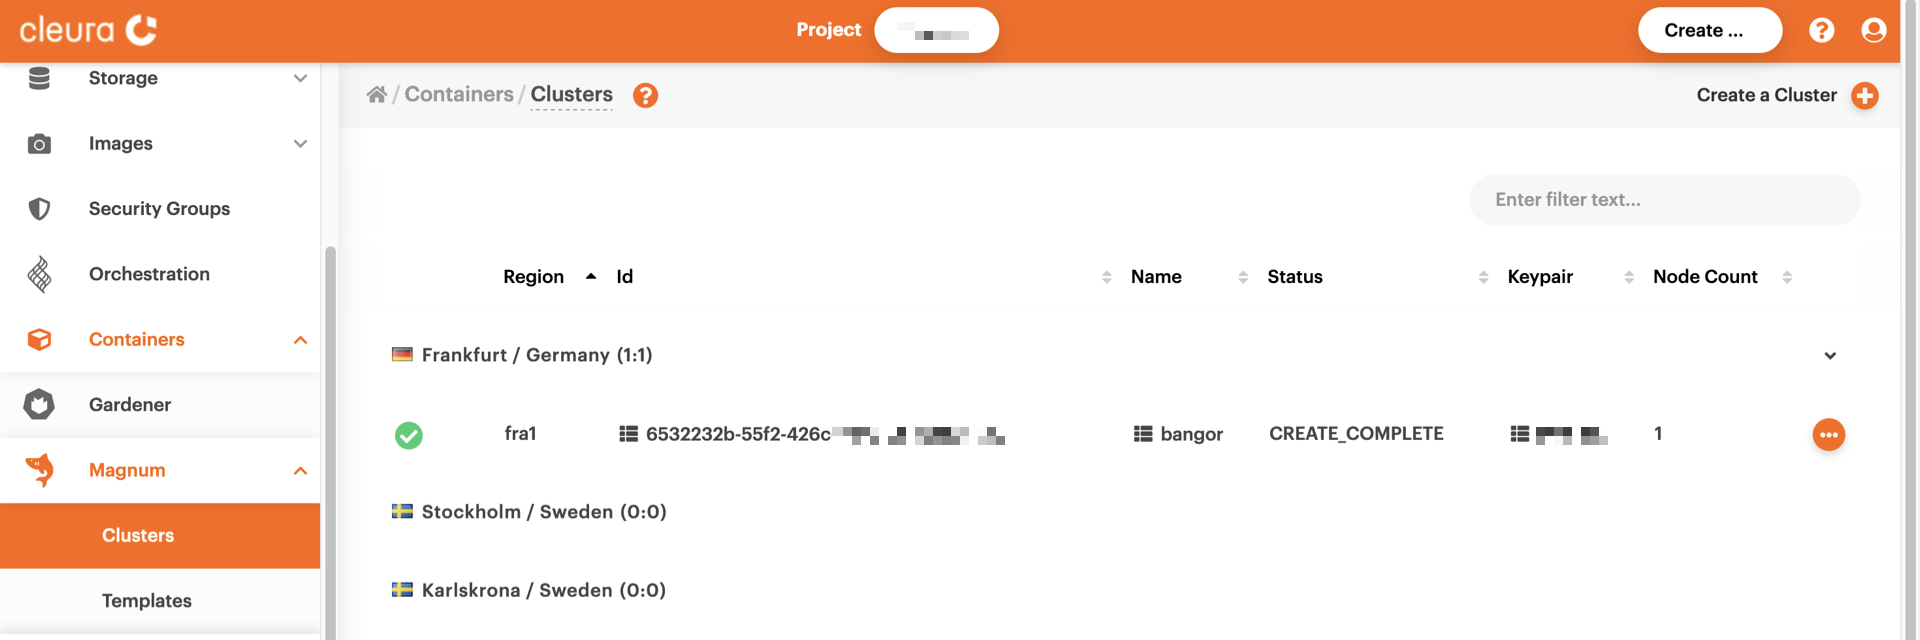
Bring the vertical pane on the left-hand side of the Cleura Cloud Management Panel in full view, then select Magnum → Clusters. In the main pane, take a look at the row of the cluster you are interested in. In our example, there is only one cluster, hence only one row.
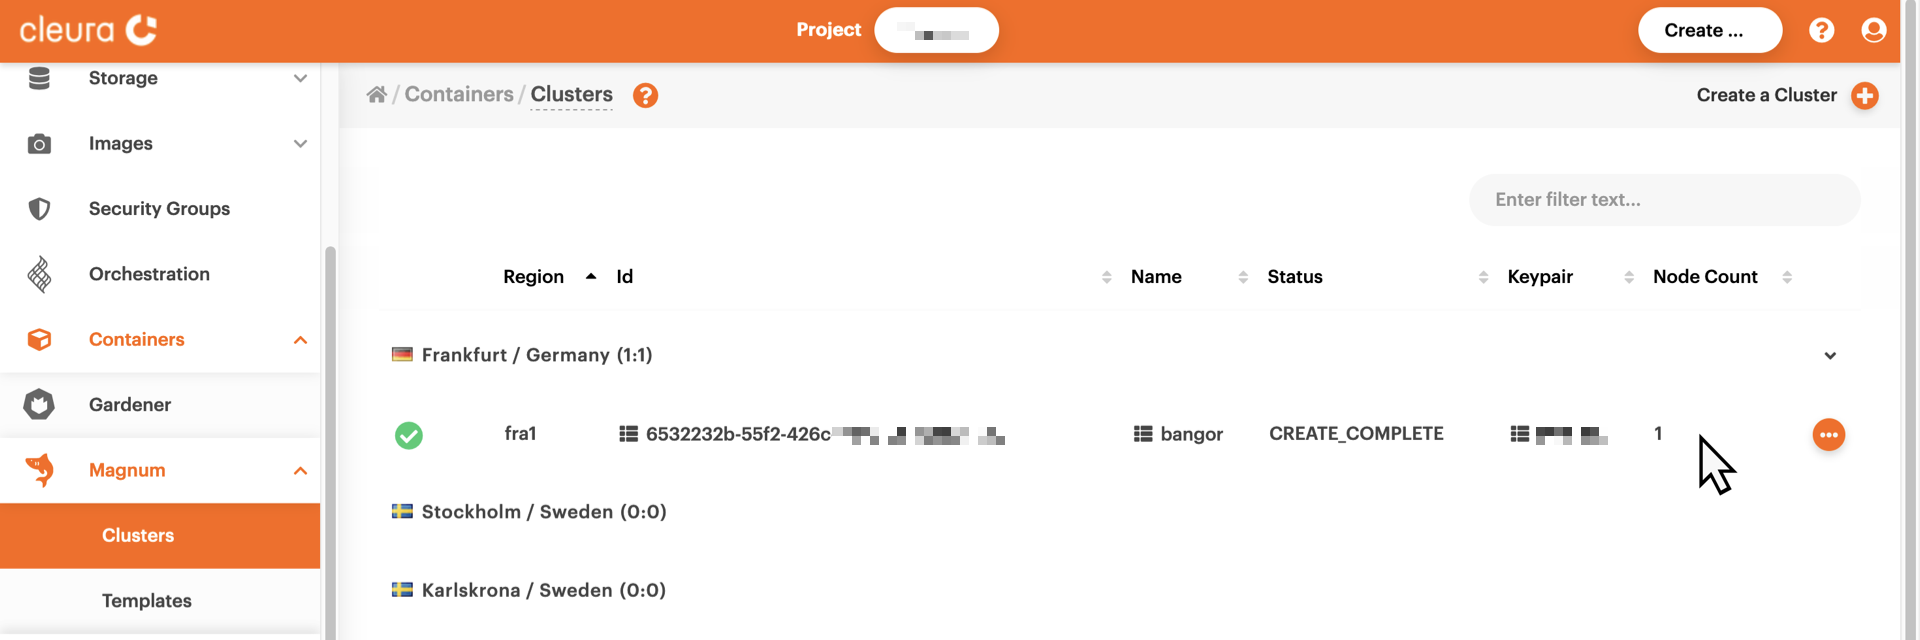
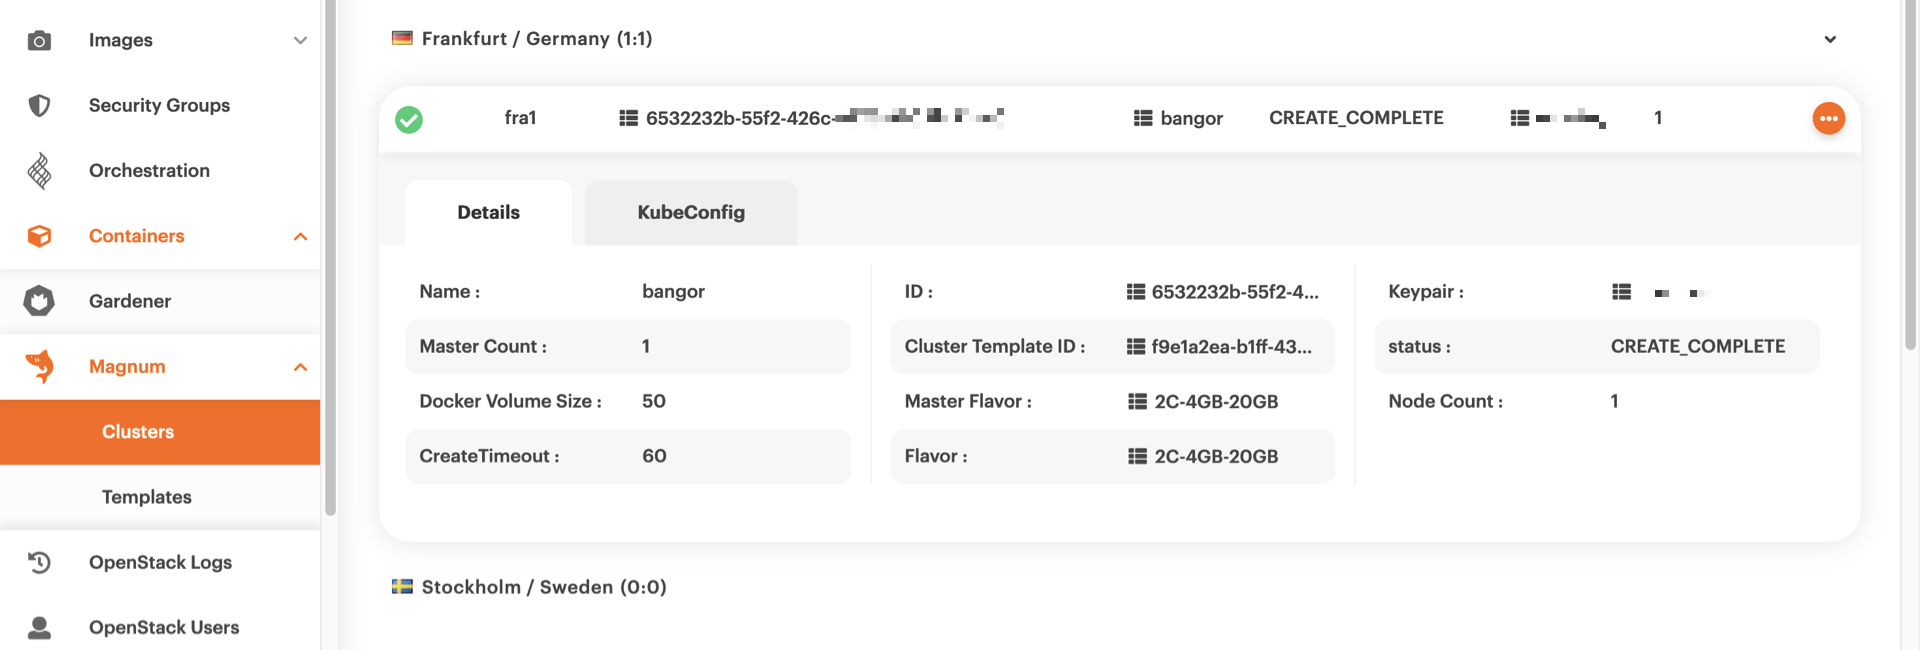
To see more of the cluster, just click on its row. Then, all relative information will appear below.
To list all available Kubernetes clusters, type:
$ openstack coe cluster list
+---------------+--------+----------+------------+--------------+---------------+---------------+
| uuid          | name   | keypair  | node_count | master_count | status        | health_status |
+---------------+--------+----------+------------+--------------+---------------+---------------+
| 7ca7838a-     | bangor | lefkanti |          1 |            1 | CREATE_COMPLE | HEALTHY       |
| aa33-4259-    |        |          |            |              | TE            |               |
| 8784-         |        |          |            |              |               |               |
| 02e5941a2cf0  |        |          |            |              |               |               |
+---------------+--------+----------+------------+--------------+---------------+---------------+
For many more details on a specific cluster, issue a command like this:
$ openstack coe cluster show $CLUSTER_NAME
+----------------------+---------------------------------------------------------------------------+
| Field                | Value                                                                     |
+----------------------+---------------------------------------------------------------------------+
| status               | CREATE_COMPLETE                                                           |
| health_status        | HEALTHY                                                                   |
| cluster_template_id  | 9ca03308-996e-4eaa-b507-5730dcc19fcc                                      |
| node_addresses       | ['198.51.100.5']                                                          |
| uuid                 | 7ca7838a-aa33-4259-8784-02e5941a2cf0                                      |
| stack_id             | 923c938a-81cd-4a0d-b645-0681ff507bc5                                      |
| status_reason        | None                                                                      |
| created_at           | 2024-07-05T12:00:41+00:00                                                 |
| updated_at           | 2024-07-05T12:08:52+00:00                                                 |
| coe_version          | v1.24.16-rancher1                                                         |
| labels               | {'container_runtime': 'containerd', 'cinder_csi_enabled': 'True',         |
|                      | 'cloud_provider_enabled': 'True', 'docker_volume_size': '20', 'kube_tag': |
|                      | 'v1.24.16-rancher1', 'hyperkube_prefix': 'docker.io/rancher/'}            |
| labels_overridden    | {}                                                                        |
| labels_skipped       | {}                                                                        |
| labels_added         | {}                                                                        |
| fixed_network        | None                                                                      |
| fixed_subnet         | None                                                                      |
| floating_ip_enabled  | True                                                                      |
| faults               |                                                                           |
| keypair              | lefkanti                                                                  |
| api_address          | https://203.0.113.129:6443                                                |
| master_addresses     | ['203.0.113.144']                                                         |
| master_lb_enabled    | True                                                                      |
| create_timeout       | 60                                                                        |
| node_count           | 1                                                                         |
| discovery_url        | https://discovery.etcd.io/f1473529bd109bea2fb02ac936497b95                |
| docker_volume_size   | 50                                                                        |
| master_count         | 1                                                                         |
| container_version    | 1.12.6                                                                    |
| name                 | bangor                                                                    |
| master_flavor_id     | b.2c4gb                                                                   |
| flavor_id            | b.4c24gb                                                                  |
| health_status_reason | {'bangor-xh3fuqin3arw-master-0.Ready': 'True', 'bangor-xh3fuqin3arw-      |
|                      | node-0.Ready': 'True', 'api': 'ok'}                                       |
| project_id           | dfc700467396428bacba4376e72cc3e9                                          |
+----------------------+---------------------------------------------------------------------------+
Interacting with your cluster
Once your new Magnum-managed Kubernetes cluster is operational, you can start interacting with it.